Selling eBooks with Print Option

One of the most common product types that WP EasyCart users like to sell are eBooks. When selling eBooks, many want to offer their customers the choice to buy the eBook, the print version, or both and want to do so without creating three different products. Thanks to our latest product options this is easily possible with the WP EasyCart! In just a few steps, we will show you here how to create the option set needed to attach to your eBook/print product and get selling right away!

Creating the Option Set

All of these instructions will occur in the EasyCart Admin -> Store Admin -> Products -> Manage Option Sets. Please navigate there to begin.

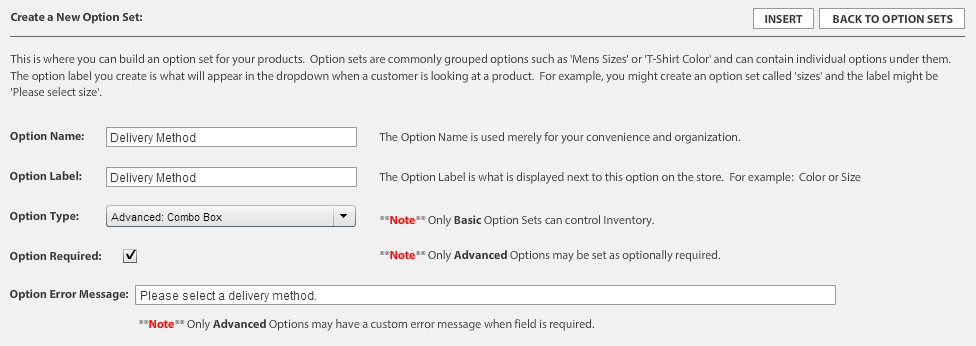
  1. Create your option set that will be used with all your eBook/print products, select the advanced combo box type.
    ebook-option-set
  2. Navigate to the area to add new option items, Edit Option Set Items -> Create New Option Item for each item 3, 4, and 5.
  3. Add your eBook only option, be sure to allow the product download and disable the product shipping. We will also only adjust the pricing for print and both, assuming the lowest cost will be for the eBook only option and the main price of the product.
    ebook-only-optionitem
  4. Add your print only option, be sure to uncheck the box to allow product download and leave the disable product shipping unchecked. We assume the price for a print book will be more than the download and will do a basic price adjustment to account for this.
    ebook-print-only-optionitem
  5. Add your eBook and print delivery option, be sure to check the allow product download and do not check the disable product shipping. We also assume the price for both items is a larger price adjustment and will use a basic price adjustment to account for this.
    ebook-both-optionitem

Setup Your Product

While setting up your product that will sell eBooks and print versions. You should start by creating a download product type and then select the following?options?to complete the setup:

  1. Set the weight and product dimensions to that of?your print version that will ship when purchased.
  2. In the Set Advanced Listing Options area, select to ship the product.
  3. Go to the option sets section and select advanced option sets and attach your delivery method option set.
  4. Go to the downloads section and upload your eBook copy.
  5. Be sure to setup all other necessary options (title, description, price, images, etc…).
  6. Insert this product.

That should do it! You have setup a product that allows the customer to purchase an eBook, print version, or both all in one product! If the customer selects an option with the print version, they will be charged the appropriate shipping price. If the customer selects an option to purchase an eBook, they will be given the appropriate links to download after the purchase is complete.

Custom Store Post Template

The WP EasyCart can leverage?the WordPress option “custom post types” to help with the linking of your products, categories, menus, and manufacturers. Using this feature, we are able to create links like http://yoursite.com/store/mens-beanie, rather than http://yoursite.com/store/?model_number=abc123.

This option is enabled in the EasyCart system by going to your WordPress Admin -> WP EasyCart -> Settings -> Additional Settings? and turn “On” the option “Use Custom Post Type Linking”. Once this is functioning, your links will now go to a more search engine friendly URL, but there is a downside. WordPress uses your default post template in your theme called “single.php”.

If this file does not look how you like or looks very different from your store page template, it will cause a disconnect from product list page to product details page. Fortunately there is a solution! Directions will be provided here, but you can read more about this setup in WordPress’s codex here:?http://codex.wordpress.org/Post_Type_Templates.

Setting Up Custom Post Template

  1. Copy your themes single.php file in your theme folder and rename it to single-ec_store.php.
  2. Make changes to this file as is needed. Many times it is best to use the layout and info from your page.php file.
  3. Go to your WordPress Admin -> WP EasyCart -> Settings -> Design and turn “On” the option “Use Theme Custom Post Template”.

This will allow your store to use a custom design for the product details, categories, menus, and manufacturers.

Custom Payment Gateway Integration

We have had a huge demand for adding a custom payment integration to your own EasyCart install and it is finally here. Starting with the release of version 3.0.19, you can add a live payment gateway that is customized by you, the programmer! Fair warning to those who are not familiar with PHP, this may be a little difficult to manage and is meant for those with a good understanding of programming.

The highest demand for this service is for those companies that use an Authorize.net emulator. This type of custom gateway is by far the easiest and will the first example provided here.

To start, lets explain how the custom payment gateway option is integrated in general, minus the programming details of customizing the class for your own payment gateway.

[divider]

Basic Custom Payment Gateway Class Setup

1. Start by going to your WordPress admin -> EasyCart Admin -> Store Setup -> Payment?Setup and in the Live Payment Gateways section, and select the last option “custom payment gateway”.

2. The system is now looking to include your new payment gateway file, so lets copy an existing payment gateway file into place and rename it so that it is included in the load of the plugin. Do this by copying the file “plugins/wp-easycart/inc/classes/gateway/ec_authorize.php” to “plugins/wp-easycart-data/ec_authorize.php” and rename the file here to “plugins/wp-easycart-data/ec_customgateway.php”.

3. The system is also looking for a class named “ec_customgateway” so lets fix this up. Open the newly copied ec_customgateway.php file and rename the class to read on the first line:

class ec_customgateway extends ec_gateway{

4. At this point you have a custom gateway setup, but need to customize this to function as a custom class to your system. Please read the next section about editing the class to work as an Authorize.net gateway emulator.

[divider]

Authorize.net Emulator Class Setup

If you have not completed the “Basic Custom Payment Gateway Class Setup”, please complete that section first. There are many companies that use the Authorize.net API as their method for collecting payment from their merchants. The reason they do this is that Authorize.net is one of the most popular, if not the most popular integration in the e-commerce industry and by leveraging their API, they can quickly integrate with any platform. Their system requires you to change the endpoint (the server that receives the transaction information) to point to their own payment servers. The following steps will help you alter the newly created payment class:

1. The first thing to do is enter your custom settings and there are two ways to do this. The easiest way is to first return to?WordPress admin -> EasyCart Admin -> Store Setup -> Payment?Setup and in the Live Payment Gateways section and change back to Authorize.net as your payment gateway. Enter your login id, transaction key, test mode off, and your currency code, then click save. At this point the authorize values are saved to your system, no matter what gateway you select from this point on. So you can now open the live payment gateway section again once the page reloads and switch it back to the custom payment gateway option. The other option here is to replace the following code:

$authorize_login_id = get_option( ‘ec_option_authorize_login_id’ );
$authorize_trans_key = get_option( ‘ec_option_authorize_trans_key’ );
$authorize_test_mode = get_option( ‘ec_option_authorize_test_mode’ );
$authorize_currency_code = get_option( ‘ec_option_authorize_currency_code’ );

TO:

$authorize_login_id =?”YOURLOGINID”;
$authorize_trans_key = “YOURTRANSKEY”;
$authorize_test_mode = false;
$authorize_currency_code = “USD”;

2. Edit the get_gateway_url method to use the emulator endpoint instead of the authorize endpoint.?The edit will change:

$is_developer_account = get_option( ‘ec_option_authorize_developer_account’ );

if( $is_developer_account )
return “https://test.authorize.net/gateway/transact.dll”;
else
return “https://secure.authorize.net/gateway/transact.dll”;

TO:

return “https://yourendpoint.com/endpoint”;

3. At this point you should be able to upload your custom gateway and run it successfully. We have noticed some errors occur in that the response may not be returned in the “body” as Authorize.net does. If this is the case, you will need to investigate the format of the response and is easily done by changing:

function handle_gateway_response( $response ){

TO:

function handle_gateway_response( $response ){

print_r( $response ); die( );

which will print the response to the screen and stop once printed. Use this to point yourself to the right response information to process and remove it when you are happy with your understanding of the response data.

[divider]

Custom Payment Gateway Company

We also know there may be some of you out there that have a company you would like to integrate with that does not follow closely to any other payment gateway. We will do our best here to describe our process for custom integration with payment gateways.

1. We recommend using the ec_securenet.php payment gateway class as a starting point. The reason for this is that it covers many of the most common requirements for custom gateway integration.

2. Typically there are two types of data format that are sent to your payment gateway, an array or XML string. The ec_securenet.php shows gateway data in the format of an array, use this is a starting point if you are going that route. If you are using a gateway that accepts XML data, look into the ec_securepay.php file instead.

3. Notice that ec_securenet.php does not use the method “get_gateway_data” as this is not necessary when you need to use a custom CURL call (ec_securenet.php does this). Some gateways work great with the default call and in this case, follow the format of returning the data through the “get_gateway_data” method. This is a technical option based on the requirements of the payment gateway. Following the ec_securenet method is the easiest way to avoid technical difficulties.

4. Some gateways require an authorization header and ec_securenet as an example of this. If your gateway does not require this, you can remove the line that adds this to the header array.

5. Once you are able to build and send your gateway data, the next, and most difficult, part is to process the response. ?We always send the response data to the “handle_gateway_response” method for processing. Please notice that if you are viewing the securenet version, the response from them is in JSON formatting and is why we process it through the json_decode function first, but many gateways return their data as an array in the $response[‘body’] array element. Our recommendation is to start by sending the whole response into the “handle_gateway_response” method and use a print out to determine where to go from there. Once you send the data to the response function, we should start by adding “print_r( $response ); die( );” to the top of the “handle_gateway_response” method. This will show you the path to getting the response messages out of the data and applying them to the correct class data elements.

6. The first processing step is determining the attribute that signifies a successful payment, typically an “APPROVED” or “SUCCESS” value and may be accessed through $response[‘body’]->result or $response[‘result’]. If XML is returned, you may need to first run the $response data through:

$response_body = $response[“body”];
$xml = new SimpleXMLElement($response_body);

and access the value by $xml->result or something similar. This is the most difficult task because it requires you to have a complete knowledge of the type of response and if it is formatted as an?array, object, xml, JSON, etc… Once you are able to access and check for success, set the $this->is_success to true or false.

7. We also ask that if there is an error, try to set $this->error_message = $xml->response_message; or whatever your response error message is.

8. The last thing to do is insert the response to the database for later access and troubleshooting. This is done by editing the following line to fit your needs:

$this->mysqli->insert_response( $this->order_id, !$this->is_success, “Gateway NAME”, print_r( $response, true ) );

If you are able to get through all of this, get a response from your gateway, process the return data?successfully, and set the success value to true or false, then you are done. The EasyCart will insert and process the order based on your success value and requires nothing else once you get your gateway setup to process the credit card through your own gateway.

[divider]

Successful Custom Payment Integration

If and when you complete your custom payment integration, you are welcome to send to us for review and to add the gateway as a default option in the cart.?Having?us add new gateways to the cart is especially useful for developers that reuse the EasyCart for multiple projects and want the same gateway to be available quickly. We are always open to adding new gateways, so please contact us in the event that you would like your gateway in the cart by default!

Getting Started with Taxes

Taxing within the EasyCart

You may not know it, but the EasyCart is a very powerful system when it comes to getting taxation correct for your store. We offer six different ways to tax your customers, ways to allow users to be tax exempt, and all the tools you need to operate within the laws in your situation. For this article we will cover our largest customer bases (USA, Canada, EU, and Australia) and give tips on how to operate within the laws most easily.

USA?Taxation

Businesses based in the USA have it easy, if you have a physical presence in a state, collect applicable local and state sales tax. If you have multiple physical locations in multiple states, then you must collect the tax applicable to each state that you have a physical presence. In addition, you only have to charge that sales tax to purchases that?ship?to?states you plan to tax, for example: No need to tax someone from Arizona if your business is located in Washington. Lately we have had?a lot of questions in regards to taxing each state you sell to, regardless of the location, but this is simply not true at this time. We happily point you to an article on the SBA’s website, which quickly confirms the small amount needed for most small businesses; to read more on this topic:?https://www.sba.gov/content/collecting-sales-tax-over-internet.

Setting up sales tax is simple for many operating in the USA (we will cover the exception next). Go to your WordPress admin and go to EasyCart Admin -> Store Admin -> Rates -> Manage Taxes to begin setting up. First select “Enable State Tax”, then, for each state you need to tax within, select the state and enter a tax rate (e.g. 8.5) and click save.

EasyCart State Tax Display

[divider]

TaxCloud_Logo

As mentioned above, there is a small exception to the rule of thumb that tax in the USA is easy for online sales. If you have lots of physical locations across a state that has different local tax rules, you are theoretically supposed to charge a sale from each area in the state a different amount. Luckily, a wonderful tool is available and already integrated for use within the WP EasyCart, Tax Cloud! Tax Cloud allows you to setup a free account and establish the necessary tax rules by cities, counties, and states, making the process of taxing the correct amount easy! For more information on integration with Tax Cloud, we refer you to our docs on the topic:?http://wpeasycart.com/docs/3.0.0/settings/advanced_options.php#taxcloud.

Canada Taxation

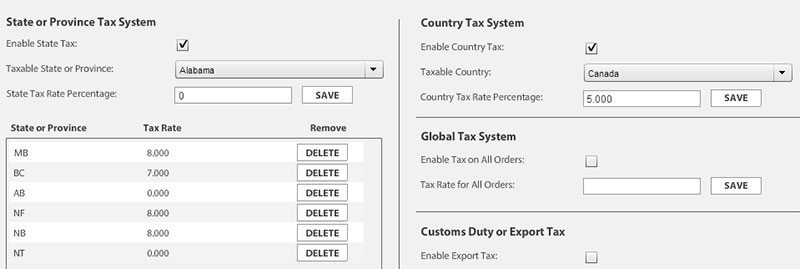
Tax in Canada consists of GST, HST, and PST, which makes setting up slightly more complicated than setting up in the USA, but never-the-less a fairly simple process once you know which options to select. The first step is to go to the WordPress admin -> EasyCart admin -> Store Admin -> Rates -> Manage Tax Rates and enable the country tax system and add a 5.00% tax for Canada. Then move over and enable the state tax system and add the appropriate tax rates for each province/territory, if you are unsure of these rates, you can find the exact rates on?http://en.wikipedia.org/wiki/Sales_taxes_in_Canada.

canada_tax_setup

EU Taxation (VAT)

We have now come to the most complicated taxation system around and because of this we offer the most options for our EU customers. Start by navigating to your WordPress Admin -> EasyCart Admin -> Store Admin -> Rates -> Manage Tax Rates. The first choice is do you want to charge VAT at a specific rate globally or different rates for each country. The latest VAT laws require you to charge VAT in the country that you ship to, so our recommendation is to go straight to the country to country rates. The next choice?is between including VAT?in the price of the product or adding VAT to the order totals during checkout and this varies from country to country so choose the method best for you, but if you choose to include VAT in the product pricing remember to set your pricing to include your countries base rate, the cart will adjust from there for each country.

VAT Setup in EasyCart

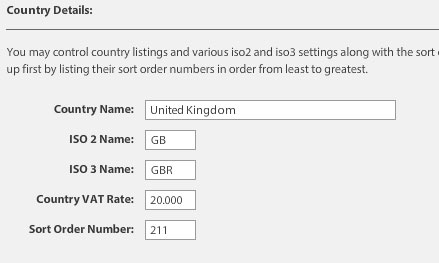
Now that you have the basics setup we should move to adding individual country rates. If you are on the screen shown above, click the set individual country rates button, otherwise navigate to EasyCart Admin -> Store Admin -> Settings -> Manage Country List and edit each country that you plan to sell to. A complete list of rates is available here:?http://en.wikipedia.org/wiki/Tax_rates_of_Europe.

EasyCart Country VAT Rate Setup

At this point you should be taxing your customers correctly according to the EU rules, but in order to be in complete compliance you will need to do a few more things to really be ready to sell. The first requirement of 2015 is that you must require your customers to confirm that they are providing accurate information as to the shipping location. To do this, first turn on the requirement that the customer agree to your terms and conditions in the WordPress Admin -> EasyCart Admin -> Store Setup -> Basic Settings and in the cart section turn on “Require Terms Agreement”. You should also add links to your terms and conditions in the basic settings while you are there, which should be a separate page on your website. Edit the agreement text in the?WordPress Admin -> EasyCart Admin -> Store Setup -> Advanced Language in the section “Cart – Payment Information”, edit the terms text to fit your specific requirements.

The final thing to know is that you are required to collect and save evidence of the customer, including the purchaser’s IP Address and proof they agreed to your terms (which should now include information about how they agree they are shipping to the intended country, even if their IP Address is outside the country). We collect this for you and can be downloaded from the?WordPress Admin -> EasyCart Admin -> Store Admin -> Orders -> Store Orders -> Export Orders. You will find this information at the far right of the downloaded excel file.

Australia Taxation (GST)

By far the easiest setup is for Australia, go to your WordPress Admin -> EasyCart Admin -> Store Admin -> Rates -> Manage Tax Rates and enable VAT tax by country with VAT included at the product level and the VAT Rate a general 10% tax. Once you save this, set the individual country rates and set Australia to 10%. This should make your store compatible by law.

To adjust the wording on the store and fix the VAT display to say GST, go to the?WordPress Admin -> EasyCart Admin -> Store Setup -> Advanced Language and edit the content to switch VAT to GST.

Other Great Options

1. Product taxation on/off – To turn tax on or off for each product, simply go into the advanced listing options while creating the product and check/uncheck the VAT option.

2. User Tax Exemption – You can allow specific users to be tax exempt by going to the user’s account in the store admin -> accounts area and?check the “Exclude Taxes” box.

3. VAT included/excluded from shipping – By default, VAT is added to the total including shipping, to disable this option go to?WordPress Admin -> EasyCart Admin -> Store Setup -> Advanced Options and turn on “No VAT For Shipping”.