WP EasyCart integrated with the MyMail newsletter plugin some time ago, and we are huge fans of its usability and ease of use. ?We have several months under our belts using this plugin with our own customers and feel we can show you some tips on how to utilize its features and give some guidance on best practices.
For those who have never use a subscriber newsletter system or sent out email campaigns from their WordPress site, it can be intimidating, but rest assured, its as easy as it can get with MyMail. ?For a low cost of $39 dollars for the plugin, you can send out professional emails to customers with news about your business, online store, tutorials, special promotions, even send out autoresponders after a user action has occurred for an automated system.
Getting Started
First, MyMail is already integrated with WP ?EasyCart, all you need to do is have both plugins installed, and then EasyCart will put users into your system as a subscriber when they checkout from an order and click ‘signup for newsletter’, create a new account and click ‘signup for newsletter’, or if you turn on the newsletter widget and they signup.
It’s that easy, nothing really to do, but makes a great way to get your subscribers into MyMail from EasyCart. ?We even offer a quick import if you have EasyCart customers and want to quickly import all the users into MyMail for the first time.
Professional Email Templates
You can certainly build your own email newsletters, but why not go to ThemeForest and search for ‘MyMail Templates’ and purchase professional email templates that are mobile responsive and cost?less than $20 dollars. ?Most templates allow you to do a multitude of variations and build your newsletter in a modular approach, yet consistent look for your customers and subscribers.
MyMail can connect to a variety of email sending services, and are a great approach to sending email campaigns without taxing your web hosting email limits. ?We especially like the use of Mandrillapp.com, which allows us to connect MyMail and send email campaigns through the Mandrill?system with a 12,000 email limit each month for free! Want to send more, it is extremely cheap to get extra emails! ?As in .10 cents per 1,000 emails!
We also like that MyMail connects to these external sending systems and keeps your spam and black listing to a minimum. Mandrillapp.com even lets you know your sending reputation, bounce rates, open rates, click through rates, and more via their dashboard.
EasyCart has extended our integration with Mandrillapp.com by allowing you to use their email services for customer confirmation emails as well, allowing you to see them being sent, resend them, and see if the emails were open.
Strategies for Newsletters
There are countless articles on the interwebs that discuss how and what to send to your customers. ?We find a good comprehensive approach is important and with MyMail, we can automate some of these newsletters while still customizing others.
Standard Newsletters – It’s a good idea to send a general newsletter about your business, what you are selling, what is new, and what in general is happening with your business once a month or even twice a month to all subscribers. ?Keep the content fresh and keep it relevant. ?It’s harder than it sounds once a month!
Order Confirmation Emails – While this is automated from EasyCart, it is usually the most read email by your users. ?It might be nice to get some custom information on there, perhaps even a special email that includes custom coupon codes for future or returning customers. ?You can easily customize the confirmation email by going into EasyCart Admin -> Language Editor and editing phrases.
Autoresponders – We really enjoy leveraging this in MyMail, because you can setup an autoresponder email to go out to users after a preset defined time. ?Maybe after someone orders, you want to send an email out to the user with special coupons, extension products, or other products they may like. ?It’s also nice to ask for reviews or other specialty articles related to their order. ?MyMail allows you to setup autoresponders quickly, easily, and professionally using their newsletter campaign builder.
Custom Subscriber Lists
This is where things get even more interesting… ?MyMail allows for subscriber lists, and you can custom code the automation of users into those lists based on products they purchase by simply creating a child layout file of our confirmation email and coding in a few lines of code to inject users who buy specific products into specific email lists. ?That is targeted email!
So a scenario may go like this; a customer orders from you and buys product XYZ. ?They will receive a confirmation email that the order was successful, you could add a small bit of coding and put this customer into not only an ‘Customer List’ for future emailing campaigns, but you could also setup an autoresponder to email this customer 2 weeks after purchase to please come back and review their experience, rate your shopping experience etc. ?You can also add this user to a ‘Product XYZ List’ so that you can later email anyone who purchased Product XYZ, or?also send automated responders to them, such as special instruction emails, etc.
WP EasyCart Extensions
While our Mandrill extension is not required for MyMail to work, it is helpful to also use for all EasyCart confirmation emails and transactional emails in conjunction with MyMail. ?This way all of your communications go through a secure dedicated professional grade email system that lets you insure deliver and takes away these extra tasks from your web hosting server.
We have been working hard and are proud to continue to push new updates and features in WP EasyCart. ?The platform is growing quickly and people seem to really be taking to the EasyCart shopping cart and eCommerce system with it’s low cost $80 dollar fee and huge list of features.
With version 3.1, we are continuing to make usability and speed our main goal. ?We have a large list of fixes and features in this release, including some major new features that many will come to like.
Speed Improvements for Everyone!
We found several key areas we could improve speed, particularly with our database indexing and within our PHP session handling. ?We found that some servers increased their speed by up to 400% with these new fixes and should help many customers, particularly godaddy hosted individuals.
One thing we have found critical to customers speed is to stay current on your WordPress and plugin updates. ?Also be sure to eliminate any old plugins that you do not use, and try to keep the plugins to a minimum if you can. ?Adding each new plugin to WordPress can cause large slow-downs in performance and download times for customers.
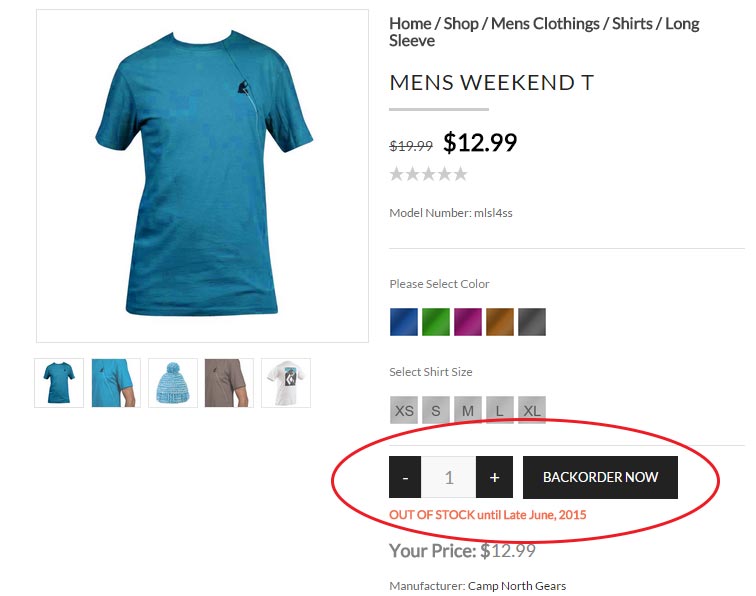
New Backorder System!
With the new backorder system, you can edit each individual product and enable the option. ?Customers can continue purchasing products even if the quantity runs out, and it will show an estimated delivery date IF you enter it for each product. ?This makes it great to continue selling goods and offering defined custom dates so they are aware of up-coming estimated delivery dates.
Once you receive your new stock, simply update the quantity in EasyCart and the ‘Backorder’ system is turned off and the product goes back into ‘Add to Cart’ functionality.
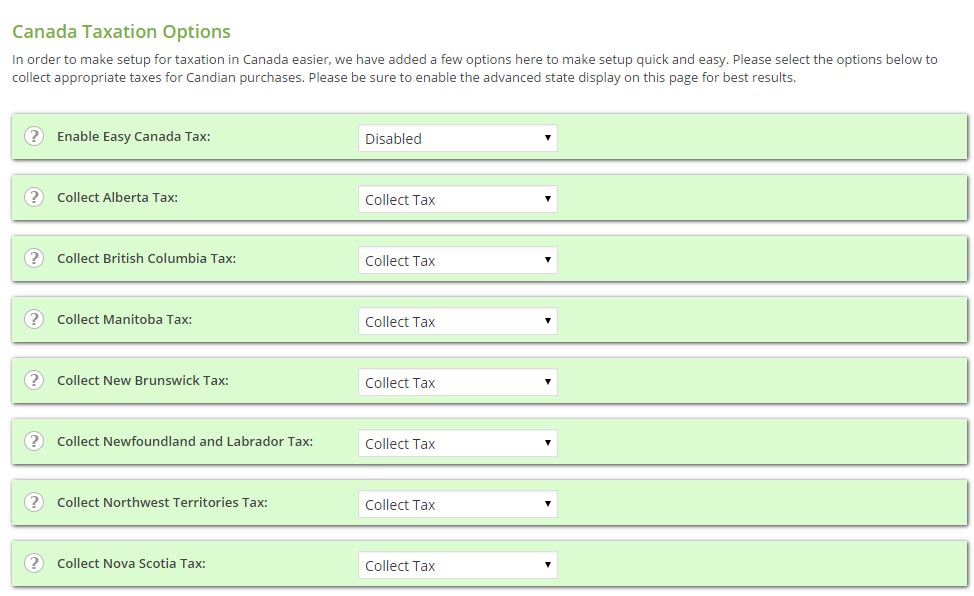
Canadian Tax System Improvements
We have vastly revamped the Canadian tax system in our advanced options setup. ?Now you can turn on Canadian taxes per province and it will display GST, HST, PST based on your specific needs. ?The display of these taxes follows through to the receipts and order panels as well, for a more accurate and proper way to handle taxes.
If you ship to the U.S., and also need tax setups, you can simultaneously run TaxCloud’s free api to get current state and county taxes right next to your canadian tax structure. ?As tax systems continue to evolve and get more complex in structure, it’s nice to know that we are working hard to make it as accurate and seamless as possible in EasyCart!
New Dimensional Option Sets
We have added a couple new option sets to our already extensive list, including the ability to add dimensions to a product and calculate square footage. ?Two types of dimensional options are available (with or without sub-inch measurements) giving your customers a chance to enter height/width combinations and EasyCart will calculate the square footage and add it to their cart.
This makes it great for selling tile, flooring, cabinetry, posters or other types of square footage material. ?Just enter a price for your product per foot and let EasyCart do the rest.
Authorize.net & Beanstream Integrations
You can now refund authorize.net transactions directly from inside the EasyCart admin consoles. ?This includes full or partial refunds and makes order management easier than ever.
We have also integrated with Beanstream, a popular payment gateway, which now increases our payment gateway reach. ?Beanstream is a popular Canadian and US gateway provider and offers low 2.65% per transaction fees. ?Learn more at?http://www.beanstream.com/?
As EasyCart continues to improve, we always look for more input from users. ?It doesn’t always mean we will get it in our software, but if you have ideas or need something added to EasyCart, just send us a support ticket and let us know. ?We have some great new things planned for version 4.0, so stay tuned as we continue to develop!
In this marketing 101 tutorial,?we want to discuss all the various options EasyCart can offer you as a business owner to market your website. ?It’s not easy, but with a lot of work and patience, you can attack each of these methods and gain more traction in the online retail world.
Marketing?Basic Concepts
Social Media – Sites such as Facebook, Twitter, Digg, MySpace, Instagram, and others that allow you to post up links, pictures, and other pieces of information about things you like. ?Others, who are associated to you in that social media, can then see your links, pictures, and information and view them. ?Makes for a great marketing platform to have your products go viral.
Coupons – We refer to coupons as something the customer has to bring to your store. ?Typically a paper coupon in a retail store, but on websites, coupons are often shopping codes that the customer enters during checkout to get an extra discount. ?Coupons do not apply to everyone, only those who receive it, making it a ‘special’ offer for some.
Promotions – We refer to promotions as something that run on your website and EVERYONE receives the discount. ?Perhaps you have a fall sale, or a special weekend sale that everyone will get on your store because it is set for a time period or specific set of products. ?No entry of a coupon code is needed to redeem.
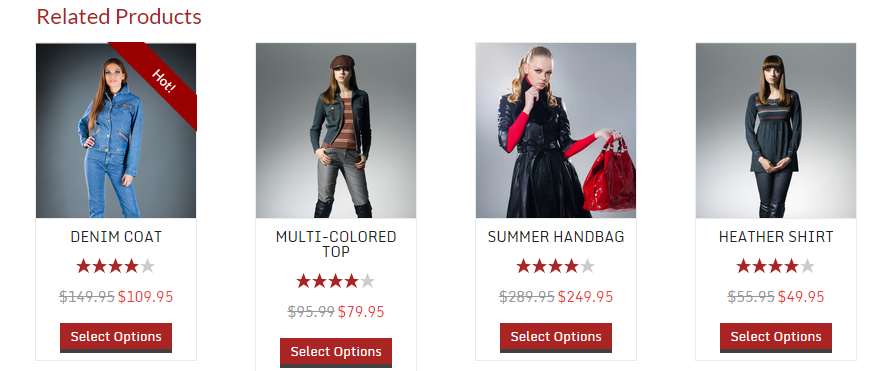
Cross-Sell – ?Showing one product, and then showing some related products that allow you to cross sell to another product. typically a ‘You may also like’ or ‘alternative products’ sections on a site.
Up-Sell – Taking an existing product, and then adding some extra value to it to get the customer to purchase a little bit more. ?Typically in the form of options, add-ons, etc.
Affiliate Marketing – Paying other people to promote your site and selling your goods. ?Affiliates will often link to your website with a special code, and in return, if customers come from that link and purchase goods, you will pay the affiliate a specific cut of the profit.
Volume Pricing – Offering pricing based on quantity purchased. ?Typically if you buy more, you can get each individual purchase at a cheaper price, especially useful tool for selling in bulk.
Customer Reviews – Ratings & customer reviews have become increasingly popular with a variety of retail goods. ?Give a bit of confidence to customers by offering other peoples opinions on the product.
SEO and AdWord Marketing – specifically target market to the search engines, so the will index you and you can benefit from organic searches from the search giants. ?You can even pay to advertise on giants like google to increase your search presence and attain higher placement on searches.
[divider]
1. ?Social Media
There are a lot of misconceptions about social media, but it is really like any other market place. ?If you are there a lot, spend the time, you can attract people, but it takes a lot of time, effort, and socializing to do so. ?Facebook and Twitter are the highly regarded giants in this area, and you should always offer at least a page for your business to share it’s latest releases and updates. ?It’s fairly easy to do and posting once a week or every couple weeks is easy to do.
You can recommend your friends like the page to begin with and it will slowly gain traction. ?One good tip we have regarding social media is to ‘Boost’ an important post or sale you display on Facebook for a small fee. ?This can get your small ad in front of thousands, get more likes, and in return more visitors and often will lead to a couple conversions on your store.
On EasyCart’s side, we offer sharable buttons for every product, so customers who visit your EasyCart products can click and share links to them. ?No need to install another social sharing plugin into WordPress, it’s all automatic with EasyCart.
[divider]
2. ?Coupons & Promotions
A great feature of EasyCart is you can create both Coupons & Promotions for products. ? Create a coupon and specify whether the coupon offers free shipping, or dollar/percentage discount. ?You can even specify the coupon will only apply to a specific product, all the products in your store, or to a specific manufacturer group.
Once you create coupons, it is entirely up to you how customers will receive that special code. ?You can develop custom email newsletter campaigns that distribute that code to specific targets, or you can post it on social media so only those folks see your coupon code. ?You can even run public local ads that only local newspaper or visitors will see and use.
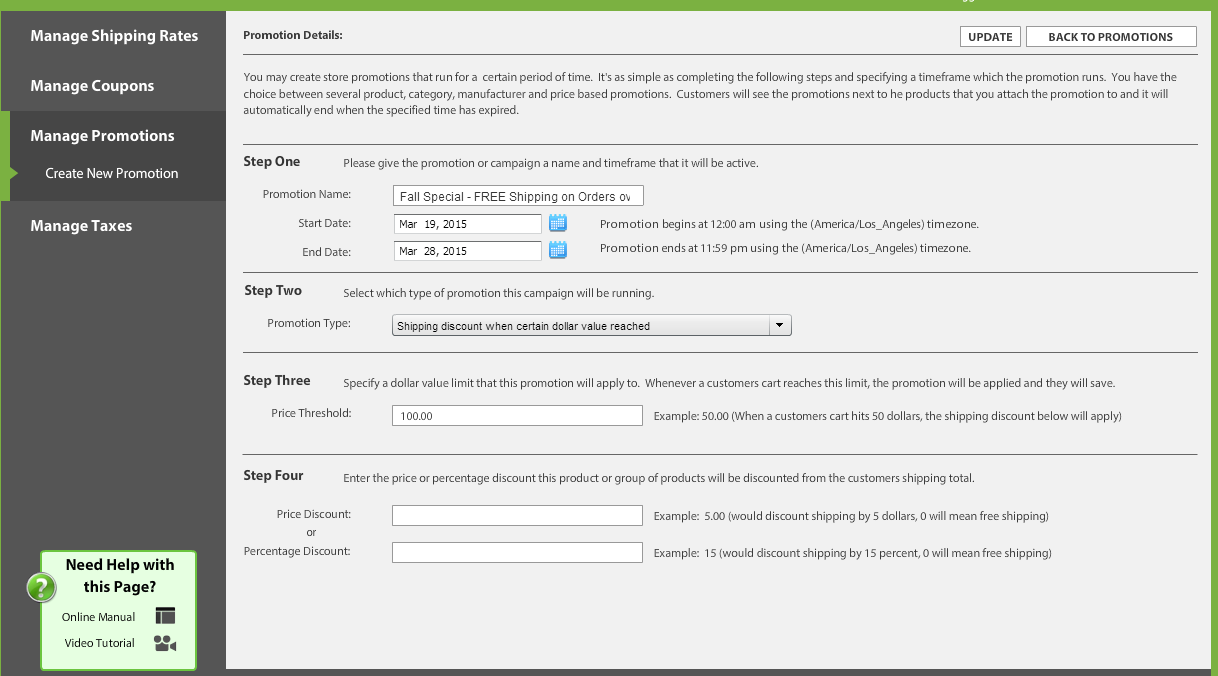
Promotions are very similar, but you can establish time periods in which the promotion will run. ?Here is an example of a promotion that will offer free shipping to any order over $100 dollars.
The best part about promotions is they apply automatically based on your specific date selection, product selection and type of promotion to run. ?All your customers benefit from the promotion and no coupon code is necessary to enter. ?So based on your specific needs and how you want to marketing, coupons OR promotions can be used in a beneficial manner.
We recommend that you run a banner on your home page or other pages that display what type of promotion is running, and even share on social media that you have a current promotion running. ?Email campaigns are another great way to spread the word and get visitors returning to your site.
EasyCart offers a vast option system that allows you to create options that change pricing for products. ?This makes a great way to display a product and then offer up-selling options to a customer as they add to the cart. ?These added value options often give the customer a sense of ‘why not’ at the product level and they are more likely to convert and add the extra options at this point rather than as separate products.
EasyCart also offers an easy way to attach like products that a customer may want to purchase. ?You as the business owner know best what customers may like, so offering some featured items or a ‘You May Also Like These’ section is a great way to suggest to a customer online what they may also like and keep more visitors shopping without having to restart the navigation process.
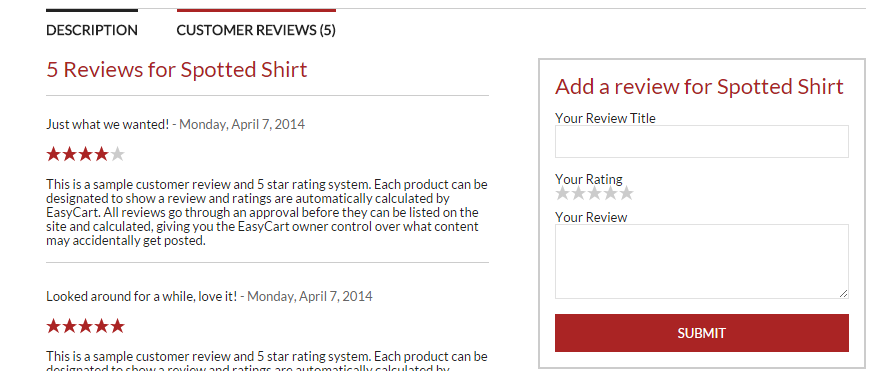
Customer reviews are another great marketing strategy to involve customers and get them to leave content on your website. ?EasyCart offers a full 5 star review system and review commenting section for you as a store owner to activate per product. ?Using this on a highly commented retail site is a great way to build confidence in customer decisions. ?Of course it may not fit in every businesses product line, but if you sell one or two goods and receiving a lot of praise from customers, offer a coupon code to anyone who leaves good positive feedback for you on social media, on your website review system, or other website.
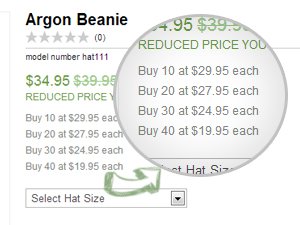
Volume pricing is a great strategy if your products fit into this type of bulk distribution. ?Give customers an incentive to buying in bulk by using the EasyCart tiered volume pricing system. ?Just establish a set price, then offer what each product will cost at various intervals of quantity, it’s easy and a great way to market a few more items.
[divider]
4. ?Affiliate Marketing (new)
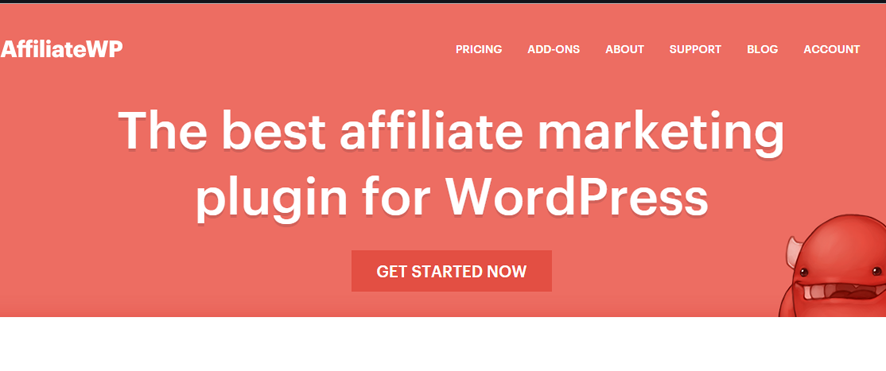
EasyCart just announced a new integration with AffiliateWP and we are continuing to develop this system further with the company. ?The beautify of the system is you can offer affiliates a way to signup and register using AffiliateWP on your website, then affiliates use their custom link to promote your site. ?The more they promote, the more they make, and the more you make. ?As each customer ?purchases, AffiliateWP software keeps track of the totals and even allows an easy one click bulk pay to the affiliates at the end of the month or other payout period of your choosing.
Affiliate marketing is a great way for you to leverage other people as marketers and to only pay them if successful. ?Affiliates will spread the word about your products in channels of friends, social media, emailers, and websites that you would never reach, and yet you get complete control over how much affiliates take in proportion to your sales.
EasyCart even built in custom rules so that you can offer each product or each affiliate custom rates based on your specific needs. ?We are working closely with AffiliateWP staff on this integration and it may change shortly to accommodate even more options.
[divider]
5. ?SEO & AdWord Marketing
One of the leading ways to market is via good old fashioned organic searches in Google, Yahoo, and Bing. ?Of course, you must realize you are now competing in a global marketplace and that your small retail store may have a million competitors in the search engine market, so here are a few strategies we recommend when focusing on search engine placements.
1. ?Don’t spend thousands of dollars on SEO companies to ‘Get you on page 1’. ?If you believe they have the answer to get you to page 1, we have some property on the moon to sell you as well!
2. ?Spend money on AdWords, not a lot, but some reasonable marketing money on google AdWords. ?Setup a small ad, and enter a few keywords that you really expect visitors to enter into a search to find you.
3. ?Keep your key words focused and unique. ?Don’t waste time on thousands of keywords, but really focus on a small handful of words that will bring in 90% of the customers.
4. ?Write content that matters. ?Your website must have actual words that people could read, blogs, stories, how-to’s, something… ?don’t expect visitors through search engines if you don’t keep relevant content on your site that is continually updating. ?Search engines even get bored if they see the same content each scan, so take time to write.
5. ?EasyCart allows you to enter each product with keywords and SEO text. ?Write descriptive descriptions and specifications if you can. ?The more unique text you write, the more relevant the products will be in searches.
6. ?Submit your EasyCart products to Google merchant feed. ?While this may not be appropriate for all businesses, nor worth the time, if you have a bunch of retail goods, get them on the shopping section of Google merchant with our merchant feed system.
7. ?Track visitors. ?If you don’t use Google analytics, get it on your website. ?You can see where visitors come from, what they search for, what pages they visit, and with EasyCart, you can enter your Google analytics code in our basic settings and track eCommerce sales data. ?How can you expect to market a site if you can’t track what is successful or what is not? ?Data is the only way to see what content is working, what changes are working, and where/why visitors come to your site. ?It’s powerful, free, and only requires a bit of knowledge and research on your part.
Conclusion
marketing an online site is a lot of work, and if?anyone felt they were going to make millions selling online without doing anything, they may be misguided… ?In fact, we always felt it takes more time selling online than in retail shops because of the amount of descriptive work that goes into displaying and selling a product. ?But do not let this discourage you, there is a lot of potential if you use the right tools, that you can get for the right price, and not eat away at your profit margins to much. ?Utilizing a bit of your own time, researching your own content, finding your niche, and then following a plan can make you a marketing genius and help catapult your business into the black.
At Level Four Development, creators of the WP EasyCart, our mission has always been to provide tools that WE would want to use, at a low affordable cost to the mass marketplaces that want to sell online… and our software success is starting to show this.
Now you can market and promote WP EasyCart and earn 10% for each referral you make. ?We have integrated with AffiliateWP and are tracking affiliate referrals so you can easily earn commission, and get paid for your recommendations.
Theme developers will be glad to know you can earn extra revenue by posting that your theme is WP EasyCart compatible and link to our website. ?Earn 10% for each referral who purchases our standard or lite version plugins.
Web designers, now you can become an affiliate and have your customers purchase a license directly from us, while still retaining 10% profit.
It’s easy, just Click Here to Sign Up?and then you will receive a unique URL to promote on social media, your website, or email and referrals are automatically tracked with your account.
https://blog.wpeasycart.com/wp-content/uploads/2015/03/affiliate-program.jpg250600Josh Joneshttps://blog.wpeasycart.com/wp-content/uploads/2021/05/Logo-V4.pngJosh Jones2015-03-05 18:49:012016-10-10 23:15:07Become an EasyCart Affiliate and Earn Cash
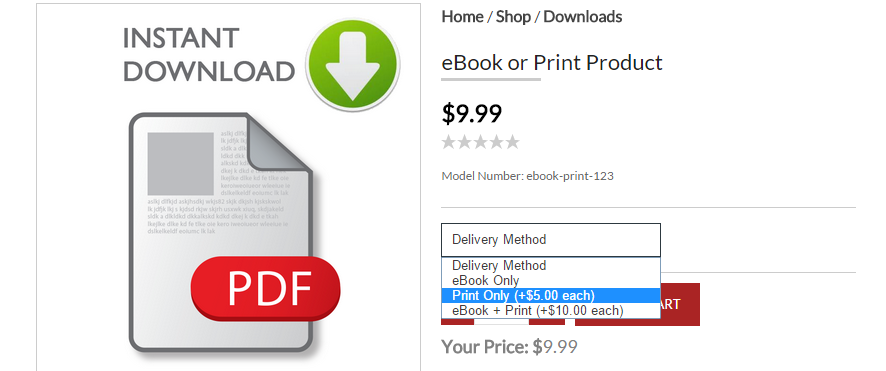
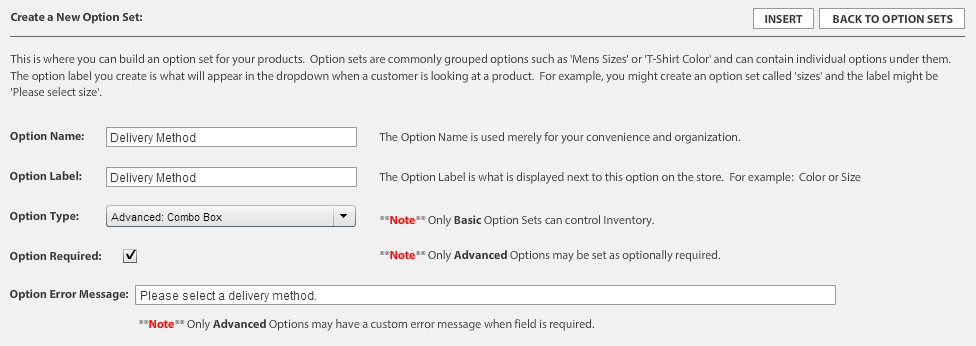
One of the most common product types that WP EasyCart users like to sell are eBooks. When selling eBooks, many want to offer their customers the choice to buy the eBook, the print version, or both and want to do so without creating three different products. Thanks to our latest product options this is easily possible with the WP EasyCart! In just a few steps, we will show you here how to create the option set needed to attach to your eBook/print product and get selling right away!
Creating the Option Set
All of these instructions will occur in the EasyCart Admin -> Store Admin -> Products -> Manage Option Sets. Please navigate there to begin.
Create your option set that will be used with all your eBook/print products, select the advanced combo box type.
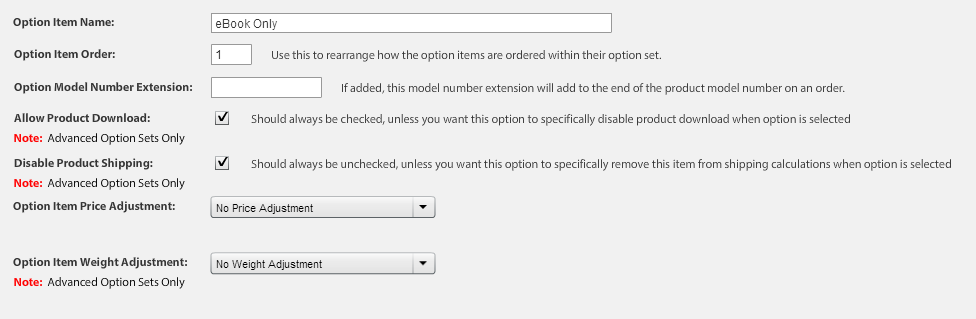
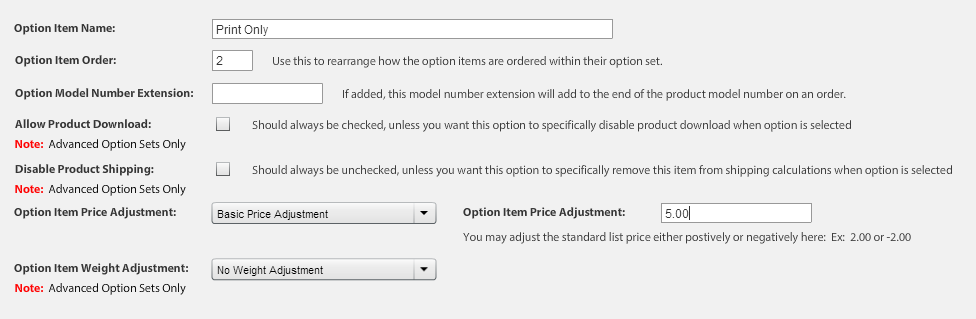
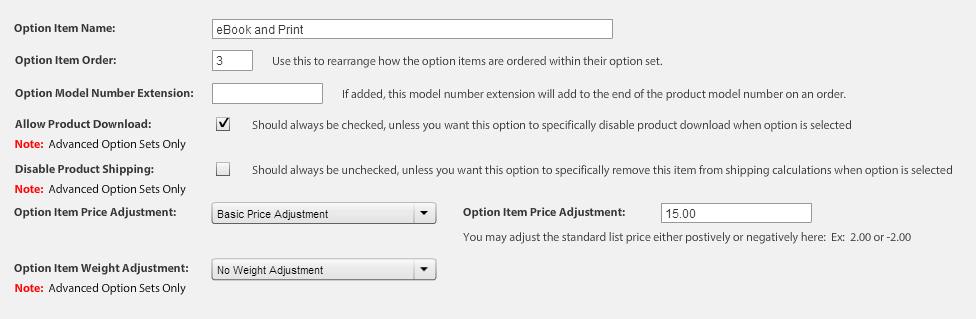
Navigate to the area to add new option items, Edit Option Set Items -> Create New Option Item for each item 3, 4, and 5.
Add your eBook only option, be sure to allow the product download and disable the product shipping. We will also only adjust the pricing for print and both, assuming the lowest cost will be for the eBook only option and the main price of the product.
Add your print only option, be sure to uncheck the box to allow product download and leave the disable product shipping unchecked. We assume the price for a print book will be more than the download and will do a basic price adjustment to account for this.
Add your eBook and print delivery option, be sure to check the allow product download and do not check the disable product shipping. We also assume the price for both items is a larger price adjustment and will use a basic price adjustment to account for this.
Setup Your Product
While setting up your product that will sell eBooks and print versions. You should start by creating a download product type and then select the following?options?to complete the setup:
Set the weight and product dimensions to that of?your print version that will ship when purchased.
In the Set Advanced Listing Options area, select to ship the product.
Go to the option sets section and select advanced option sets and attach your delivery method option set.
Go to the downloads section and upload your eBook copy.
Be sure to setup all other necessary options (title, description, price, images, etc…).
Insert this product.
That should do it! You have setup a product that allows the customer to purchase an eBook, print version, or both all in one product! If the customer selects an option with the print version, they will be charged the appropriate shipping price. If the customer selects an option to purchase an eBook, they will be given the appropriate links to download after the purchase is complete.
https://blog.wpeasycart.com/wp-content/uploads/layerslider/WP-EasyCart-V3.2.7/v327-banner-slide2.jpg8791903Josh Joneshttps://blog.wpeasycart.com/wp-content/uploads/2021/05/Logo-V4.pngJosh Jones2015-02-24 19:04:302016-10-02 14:13:06Selling eBooks with Print Option
The WP EasyCart can leverage?the WordPress option “custom post types” to help with the linking of your products, categories, menus, and manufacturers. Using this feature, we are able to create links like http://yoursite.com/store/mens-beanie, rather than http://yoursite.com/store/?model_number=abc123.
This option is enabled in the EasyCart system by going to your WordPress Admin -> WP EasyCart -> Settings -> Additional Settings? and turn “On” the option “Use Custom Post Type Linking”. Once this is functioning, your links will now go to a more search engine friendly URL, but there is a downside. WordPress uses your default post template in your theme called “single.php”.
If this file does not look how you like or looks very different from your store page template, it will cause a disconnect from product list page to product details page. Fortunately there is a solution! Directions will be provided here, but you can read more about this setup in WordPress’s codex here:?http://codex.wordpress.org/Post_Type_Templates.
Setting Up Custom Post Template
Copy your themes single.php file in your theme folder and rename it to single-ec_store.php.
Make changes to this file as is needed. Many times it is best to use the layout and info from your page.php file.
Go to your WordPress Admin -> WP EasyCart -> Settings -> Design and turn “On” the option “Use Theme Custom Post Template”.
This will allow your store to use a custom design for the product details, categories, menus, and manufacturers.
https://blog.wpeasycart.com/wp-content/uploads/2014/01/validate_imag1.jpg282492Josh Joneshttps://blog.wpeasycart.com/wp-content/uploads/2021/05/Logo-V4.pngJosh Jones2015-02-17 19:03:302017-12-14 17:03:44Custom Store Post Template
We have had a huge demand for adding a custom payment integration to your own EasyCart install and it is finally here. Starting with the release of version 3.0.19, you can add a live payment gateway that is customized by you, the programmer! Fair warning to those who are not familiar with PHP, this may be a little difficult to manage and is meant for those with a good understanding of programming.
The highest demand for this service is for those companies that use an Authorize.net emulator. This type of custom gateway is by far the easiest and will the first example provided here.
To start, lets explain how the custom payment gateway option is integrated in general, minus the programming details of customizing the class for your own payment gateway.
[divider]
Basic Custom Payment Gateway Class Setup
1. Start by going to your WordPress admin -> EasyCart Admin -> Store Setup -> Payment?Setup and in the Live Payment Gateways section, and select the last option “custom payment gateway”.
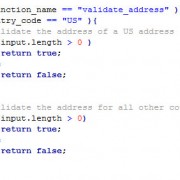
2. The system is now looking to include your new payment gateway file, so lets copy an existing payment gateway file into place and rename it so that it is included in the load of the plugin. Do this by copying the file “plugins/wp-easycart/inc/classes/gateway/ec_authorize.php” to “plugins/wp-easycart-data/ec_authorize.php” and rename the file here to “plugins/wp-easycart-data/ec_customgateway.php”.
3. The system is also looking for a class named “ec_customgateway” so lets fix this up. Open the newly copied ec_customgateway.php file and rename the class to read on the first line:
class ec_customgateway extends ec_gateway{
4. At this point you have a custom gateway setup, but need to customize this to function as a custom class to your system. Please read the next section about editing the class to work as an Authorize.net gateway emulator.
[divider]
Authorize.net Emulator Class Setup
If you have not completed the “Basic Custom Payment Gateway Class Setup”, please complete that section first. There are many companies that use the Authorize.net API as their method for collecting payment from their merchants. The reason they do this is that Authorize.net is one of the most popular, if not the most popular integration in the e-commerce industry and by leveraging their API, they can quickly integrate with any platform. Their system requires you to change the endpoint (the server that receives the transaction information) to point to their own payment servers. The following steps will help you alter the newly created payment class:
1. The first thing to do is enter your custom settings and there are two ways to do this. The easiest way is to first return to?WordPress admin -> EasyCart Admin -> Store Setup -> Payment?Setup and in the Live Payment Gateways section and change back to Authorize.net as your payment gateway. Enter your login id, transaction key, test mode off, and your currency code, then click save. At this point the authorize values are saved to your system, no matter what gateway you select from this point on. So you can now open the live payment gateway section again once the page reloads and switch it back to the custom payment gateway option. The other option here is to replace the following code:
3. At this point you should be able to upload your custom gateway and run it successfully. We have noticed some errors occur in that the response may not be returned in the “body” as Authorize.net does. If this is the case, you will need to investigate the format of the response and is easily done by changing:
function handle_gateway_response( $response ){
TO:
function handle_gateway_response( $response ){
print_r( $response ); die( );
which will print the response to the screen and stop once printed. Use this to point yourself to the right response information to process and remove it when you are happy with your understanding of the response data.
[divider]
Custom Payment Gateway Company
We also know there may be some of you out there that have a company you would like to integrate with that does not follow closely to any other payment gateway. We will do our best here to describe our process for custom integration with payment gateways.
1. We recommend using the ec_securenet.php payment gateway class as a starting point. The reason for this is that it covers many of the most common requirements for custom gateway integration.
2. Typically there are two types of data format that are sent to your payment gateway, an array or XML string. The ec_securenet.php shows gateway data in the format of an array, use this is a starting point if you are going that route. If you are using a gateway that accepts XML data, look into the ec_securepay.php file instead.
3. Notice that ec_securenet.php does not use the method “get_gateway_data” as this is not necessary when you need to use a custom CURL call (ec_securenet.php does this). Some gateways work great with the default call and in this case, follow the format of returning the data through the “get_gateway_data” method. This is a technical option based on the requirements of the payment gateway. Following the ec_securenet method is the easiest way to avoid technical difficulties.
4. Some gateways require an authorization header and ec_securenet as an example of this. If your gateway does not require this, you can remove the line that adds this to the header array.
5. Once you are able to build and send your gateway data, the next, and most difficult, part is to process the response. ?We always send the response data to the “handle_gateway_response” method for processing. Please notice that if you are viewing the securenet version, the response from them is in JSON formatting and is why we process it through the json_decode function first, but many gateways return their data as an array in the $response[‘body’] array element. Our recommendation is to start by sending the whole response into the “handle_gateway_response” method and use a print out to determine where to go from there. Once you send the data to the response function, we should start by adding “print_r( $response ); die( );” to the top of the “handle_gateway_response” method. This will show you the path to getting the response messages out of the data and applying them to the correct class data elements.
6. The first processing step is determining the attribute that signifies a successful payment, typically an “APPROVED” or “SUCCESS” value and may be accessed through $response[‘body’]->result or $response[‘result’]. If XML is returned, you may need to first run the $response data through:
$response_body = $response[“body”];
$xml = new SimpleXMLElement($response_body);
and access the value by $xml->result or something similar. This is the most difficult task because it requires you to have a complete knowledge of the type of response and if it is formatted as an?array, object, xml, JSON, etc… Once you are able to access and check for success, set the $this->is_success to true or false.
7. We also ask that if there is an error, try to set $this->error_message = $xml->response_message; or whatever your response error message is.
8. The last thing to do is insert the response to the database for later access and troubleshooting. This is done by editing the following line to fit your needs:
If you are able to get through all of this, get a response from your gateway, process the return data?successfully, and set the success value to true or false, then you are done. The EasyCart will insert and process the order based on your success value and requires nothing else once you get your gateway setup to process the credit card through your own gateway.
[divider]
Successful Custom Payment Integration
If and when you complete your custom payment integration, you are welcome to send to us for review and to add the gateway as a default option in the cart.?Having?us add new gateways to the cart is especially useful for developers that reuse the EasyCart for multiple projects and want the same gateway to be available quickly. We are always open to adding new gateways, so please contact us in the event that you would like your gateway in the cart by default!
You may not know it, but the EasyCart is a very powerful system when it comes to getting taxation correct for your store. We offer six different ways to tax your customers, ways to allow users to be tax exempt, and all the tools you need to operate within the laws in your situation. For this article we will cover our largest customer bases (USA, Canada, EU, and Australia) and give tips on how to operate within the laws most easily.
USA?Taxation
Businesses based in the USA have it easy, if you have a physical presence in a state, collect applicable local and state sales tax. If you have multiple physical locations in multiple states, then you must collect the tax applicable to each state that you have a physical presence. In addition, you only have to charge that sales tax to purchases that?ship?to?states you plan to tax, for example: No need to tax someone from Arizona if your business is located in Washington. Lately we have had?a lot of questions in regards to taxing each state you sell to, regardless of the location, but this is simply not true at this time. We happily point you to an article on the SBA’s website, which quickly confirms the small amount needed for most small businesses; to read more on this topic:?https://www.sba.gov/content/collecting-sales-tax-over-internet.
Setting up sales tax is simple for many operating in the USA (we will cover the exception next). Go to your WordPress admin and go to EasyCart Admin -> Store Admin -> Rates -> Manage Taxes to begin setting up. First select “Enable State Tax”, then, for each state you need to tax within, select the state and enter a tax rate (e.g. 8.5) and click save.
[divider]
As mentioned above, there is a small exception to the rule of thumb that tax in the USA is easy for online sales. If you have lots of physical locations across a state that has different local tax rules, you are theoretically supposed to charge a sale from each area in the state a different amount. Luckily, a wonderful tool is available and already integrated for use within the WP EasyCart, Tax Cloud! Tax Cloud allows you to setup a free account and establish the necessary tax rules by cities, counties, and states, making the process of taxing the correct amount easy! For more information on integration with Tax Cloud, we refer you to our docs on the topic:?http://wpeasycart.com/docs/3.0.0/settings/advanced_options.php#taxcloud.
Canada Taxation
Tax in Canada consists of GST, HST, and PST, which makes setting up slightly more complicated than setting up in the USA, but never-the-less a fairly simple process once you know which options to select. The first step is to go to the WordPress admin -> EasyCart admin -> Store Admin -> Rates -> Manage Tax Rates and enable the country tax system and add a 5.00% tax for Canada. Then move over and enable the state tax system and add the appropriate tax rates for each province/territory, if you are unsure of these rates, you can find the exact rates on?http://en.wikipedia.org/wiki/Sales_taxes_in_Canada.
EU Taxation (VAT)
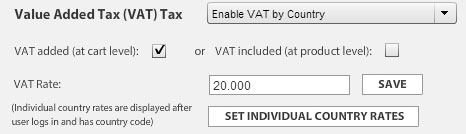
We have now come to the most complicated taxation system around and because of this we offer the most options for our EU customers. Start by navigating to your WordPress Admin -> EasyCart Admin -> Store Admin -> Rates -> Manage Tax Rates. The first choice is do you want to charge VAT at a specific rate globally or different rates for each country. The latest VAT laws require you to charge VAT in the country that you ship to, so our recommendation is to go straight to the country to country rates. The next choice?is between including VAT?in the price of the product or adding VAT to the order totals during checkout and this varies from country to country so choose the method best for you, but if you choose to include VAT in the product pricing remember to set your pricing to include your countries base rate, the cart will adjust from there for each country.
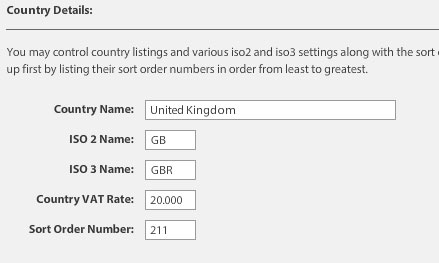
Now that you have the basics setup we should move to adding individual country rates. If you are on the screen shown above, click the set individual country rates button, otherwise navigate to EasyCart Admin -> Store Admin -> Settings -> Manage Country List and edit each country that you plan to sell to. A complete list of rates is available here:?http://en.wikipedia.org/wiki/Tax_rates_of_Europe.
At this point you should be taxing your customers correctly according to the EU rules, but in order to be in complete compliance you will need to do a few more things to really be ready to sell. The first requirement of 2015 is that you must require your customers to confirm that they are providing accurate information as to the shipping location. To do this, first turn on the requirement that the customer agree to your terms and conditions in the WordPress Admin -> EasyCart Admin -> Store Setup -> Basic Settings and in the cart section turn on “Require Terms Agreement”. You should also add links to your terms and conditions in the basic settings while you are there, which should be a separate page on your website. Edit the agreement text in the?WordPress Admin -> EasyCart Admin -> Store Setup -> Advanced Language in the section “Cart – Payment Information”, edit the terms text to fit your specific requirements.
The final thing to know is that you are required to collect and save evidence of the customer, including the purchaser’s IP Address and proof they agreed to your terms (which should now include information about how they agree they are shipping to the intended country, even if their IP Address is outside the country). We collect this for you and can be downloaded from the?WordPress Admin -> EasyCart Admin -> Store Admin -> Orders -> Store Orders -> Export Orders. You will find this information at the far right of the downloaded excel file.
Australia Taxation (GST)
By far the easiest setup is for Australia, go to your WordPress Admin -> EasyCart Admin -> Store Admin -> Rates -> Manage Tax Rates and enable VAT tax by country with VAT included at the product level and the VAT Rate a general 10% tax. Once you save this, set the individual country rates and set Australia to 10%. This should make your store compatible by law.
To adjust the wording on the store and fix the VAT display to say GST, go to the?WordPress Admin -> EasyCart Admin -> Store Setup -> Advanced Language and edit the content to switch VAT to GST.
Other Great Options
1. Product taxation on/off – To turn tax on or off for each product, simply go into the advanced listing options while creating the product and check/uncheck the VAT option.
2. User Tax Exemption – You can allow specific users to be tax exempt by going to the user’s account in the store admin -> accounts area and?check the “Exclude Taxes” box.
3. VAT included/excluded from shipping – By default, VAT is added to the total including shipping, to disable this option go to?WordPress Admin -> EasyCart Admin -> Store Setup -> Advanced Options and turn on “No VAT For Shipping”.
https://blog.wpeasycart.com/wp-content/uploads/2015/02/TaxCloud_Logo.gif189300Josh Joneshttps://blog.wpeasycart.com/wp-content/uploads/2021/05/Logo-V4.pngJosh Jones2015-02-04 19:39:022016-11-04 17:20:33Getting Started with Taxes
WP EasyCart offers an abundant amount of shipping options all within a low-cost plugin, but that doesn’t mean the options are not as powerful as some competitors plugins. ?The shipping options of an online business can be confusing, and often difficult to setup regardless of the plugin used and the configuration needed. ?When you consider all the facts that need to go into a good well rounded shipping system, it can easily be overwhelming.
This guide is to help you consider some of the many options EasyCart has to offer. ?While I will be the first to say we do not offer ALL shipping configurations and options one could conceive, we do offer a good well rounded majority of choices that many businesses can adopt.
First Tip: ?? Before you read further,?consider every software package is built for the masses, so if you have developed a shipping system that MUST be used, reconsider as it may not be conventional at all and/or have a small portion that will not conform to any software package… ?be flexible as you explore options in software.
?Second Tip: ?Are your products shippable. ?Not every item in EasyCart is made to apply to shipping charges. ?Downloads and Gift Cards for example are digital goods, they will not trigger shipping charges on checkout. ?Also consider if you have a weight for a product! ?If you enter a weight of 0.00 for a product, then it’s considered intangible good like a service… so shipping will not apply.
[divider]
Step One: ?Determine your Shipping System
WP EasyCart offers a variety of systems, all fit different businesses, different models, and will likely cover at least a good portion of what shipping system you need in your business.
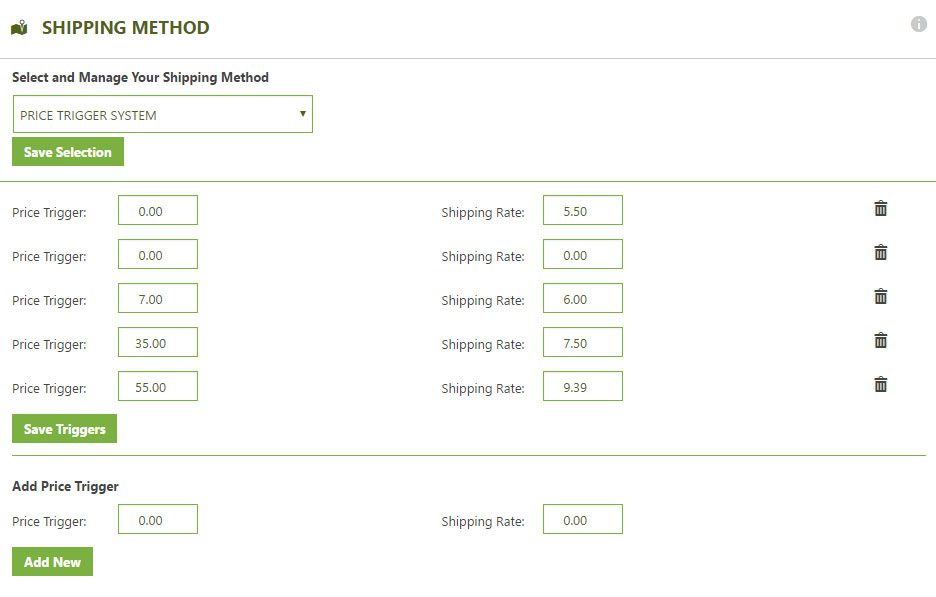
Price and Weight?Table Rate – These methods use triggers to establish shipping prices. ?The are extremely stable if you set them up correctly and provide a quick return on shipping rates. ?You essentially enter either a price or weight?that you want to trigger and the rate it should show. ?So you start with a trigger price or quantity ?of 0.00 and then establish a rate, say $5.00. ?Then at maybe $50 dollars you want to trigger a rate of $7.50 and then at $100 you want to trigger $10.00. ?so on and so forth. ?Same goes for weight, if a user has a total weight order of 5?in their cart, then trigger $x.xx amount, so on and so forth. ?Remember that weight in EasyCart is just a numeric value… it can represent pounds or ounces, you set the measurement of calculation in various places where appropriate, such as live shipping gateways which use this. ? Easy to setup, and easy to see working.
Percentage Table Rate – This method is the same as price and quantity, except you simply establish a set percentage when a trigger price range is reached. ?Say from $0.00 to $99 dollars you want to charge 10% shipping, and then from $100 – $500 in cart total you want to charge 7.5% in shipping, this method allows you establish tiered pricing using ?a percentage of their order. ?Again, very easy to setup and very reliable system.
Quantity Table Rate – Like the other table rates, quantity table rate shipping simply adds the total in the cart. ?This can be appropriate if you need to track how many items there are and then charge appropriately. ?Set a quantity trigger, and then the price to charge. ?The quantity table system only looks at products, so if you have option sets that change quantity, it will likely not be affected. ?So this may work in your situation, or it may not. ?It’s reliable and easy to setup.
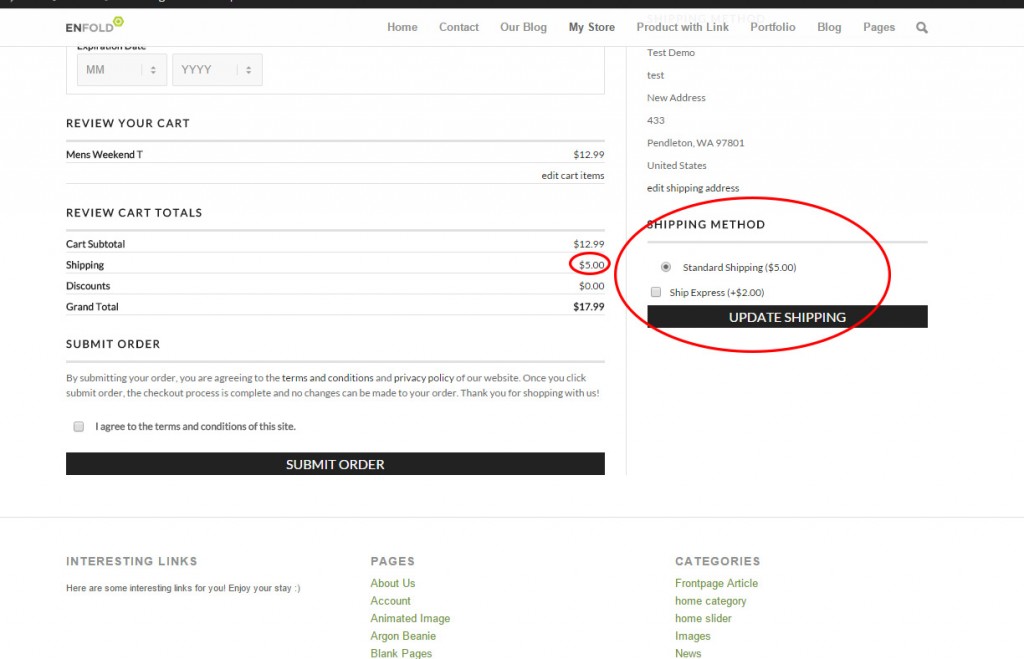
Static Method Rates – ?These are by far the most reliable shipping methods available. ?Set a name for the static shipping and a rate… that’s it. ?So if you always ship ‘Standard Ground’ and charge $5.00 for it, use this method. ?Customers always see the correct list of options. ?You can create several shipping methods using this option, such as a ‘Ground’, ‘Next Day Air’, ‘Express’, ‘In Store Pickup’ or whatever you need. ?It gives you control over labeling, pricing, and options available to customers.
Fraktjakt – This is primarily only available to swedish residents, but a popular option that allows customers to select from several live carrier rates and get current up to date rates.
Live Shipping -?UPS, FedEx, USPS, DHL, Australian Post, and Canadian Post have all been pre-integrated with EasyCart. ?Live shipping can be intriguing and many businesses think they want live rates, but there are a few considerations before you choose to go this route. ?Every detail must be accounted for on your part of the setup. ?If you think you can just offer UPS Ground, think again… ?Hawaii, international orders, they will see error messages with that setup. ?If you offer only Express and 2nd day air, think again, some cities don’t offer all services… so those customers will see error messages.
Live shipping can be difficult to understand, but the key to it is to consider every single variable in the shipping world and it needs to be setup. ?If you are game to tackle this, then we can show you some tips.
1. ?Setup one shipping carrier first, get it working, connected, and then move on to another carrier.
2. ?Include as many shipping codes as you can. ?I realize you may just want ‘ground’ and ‘2nd day air’ but those may not be available in all cities or locations. ?Adding more shipping codes means that you will likely get more to show to the customer and also less errors and holes in your locations.
3. ?Do not apply shipping zones. ?We will discuss this later, but if you only ship to US and Canada, don’t create zones for that. ?The purpose of zones is to provide different rates, not limit who can buy on your store. ?Get the entire shipping system working for your default country, whether that be US, Canada, Europe, Australia, or wherever…
4. ?Use as few shipping carriers as possible. ?It may be nice to show FedEx, USPS, UPS, and DHL, but that’s 4 calls to 4 carriers during checkout and can greatly slow the system down. ?Try to stick with one or two.
5. ?If you want to offer free shipping, simply add a common shipping code, such as ‘Ground’ and then override the price with $0.00. ?You can even override the name of it and say ‘FREE shipping’ so customers have that as a selection.
6. ?Even if you enter 6, 7, 10 shipping codes, EasyCart will only display what the carrier returns for that location. ?So your customer may only see 1, 2 or 3 rates. ?This is why we really suggest testing. ?We have found some cities require select shipping codes if shipping within the same city. ?If you have zero rates returned, we suggest you look at your settings zip code and the zip code during checkout and contact your carrier to see what rates are available.
7. ?IF you have negotiated special rates with your carrier, we will try to display those instead of general rates. ?AGAIN, test, test, test… ?you are the web developer and that is part of the job!
[divider]
Step Two: Test Your System
We can not say it enough, but as a WordPress user you are likely taking on the task of making a website yourself. ?Part of that job is to test your system. ?Don’t assume it should just work or is working without going through the entire checkout process as a customer would. ?This would be like fixed someones automobile as a mechanic and then assume it’s fixed and hand the vehicle over to the customer. ?Always check to see if it is working as desired and fix accordingly.
Even when using basic table rate shipping systems, we have seen gaps in triggers, which means there is no rate going to show up. ?We have seen live shipping setups without any shipping codes, which means no user will ever be charged shipping.
[divider]
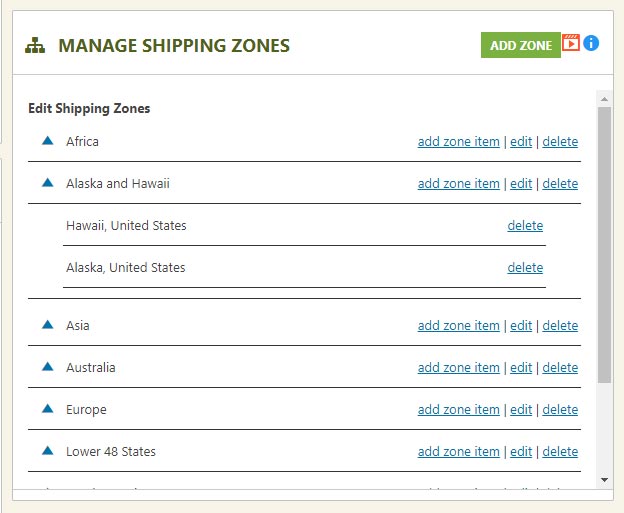
Step Three: ?Adding Shipping Zones
IF you feel you need to have a shipping zone, then you must be thorough about your setup. ?Shipping Zones is not for the faint of heart. ?You must have a thorough knowledge of what it means to setup a shipping zone, and DO NOT use shipping zones to limit who can buy from your store. ?That is not the purpose. ?IF you want to remove china or any country from ordering, do so by removing the country from the pull down of countries within the store admin -> settings -> manage countries.
Third?Tip: ?Think of shipping zones as a post-address filter. ?It only works AFTER the customer has entered their billing/shipping address information. ?NOT when a customer just views the shopping cart.
So you decide you want to setup different rates for the US versus Australia versus Canada… ?EasyCart can do that, but only with the right setup.
1. ?Setup all of your shipping for your default country with ‘Do Not Apply Zone’ for every setting. ?Whether using table rates, static, or live rates, set it up first without any zones.
2. ?Test to insure it’s working for your default country. ?What this will do is establish a ‘Default’ rate that all customers will see when they simply add an item to the shopping cart and view the cart. ?Remember, they have not entered their address yet, so without a default, they would just see $0.00 for shipping, and it’s better to supply SOME type of shipping in the cart.
3. ?Once all your default shipping is working, now you can setup a shipping zone. ?Lets say you are in australia, and you setup all your shipping for australian customers. ?Now you can add more shipping prices, triggers, or live shipping codes and add a shipping code. ?So maybe you use Australian POST live rates, you could add ‘International shipping’ with a shipping zone of ‘North America’. ?IF easycart sees a user checking out from anywhere in North America, it will apply International Shipping code that you applied. ?If someone from Europe ordered, it would not see this ‘Post Fitler’ and just apply default shipping codes.
4. ?This means if you use, for example, Price or Weight table rates, you would setup an entire table structure with ‘Do Not Apply Zone’ and then you would create an entire table structure for ?each zone. ?It’s necessary that you do not have any gaps, so 10 trigger rates would be added for default, then north america, then europe, then asia, so on and so forth. ?This way you do not have any gaps…
Fourth?Tip: ?If you get confused, create a simple spreadsheet, list out the ‘Shipping Method’, ‘Trigger Rates’, and the ‘Rate expected’ and you can see how vast the options can become. ?Now throw in a shipping zone and see things multiply! ?Pre-Planning is important and can become overwhelming
[divider]
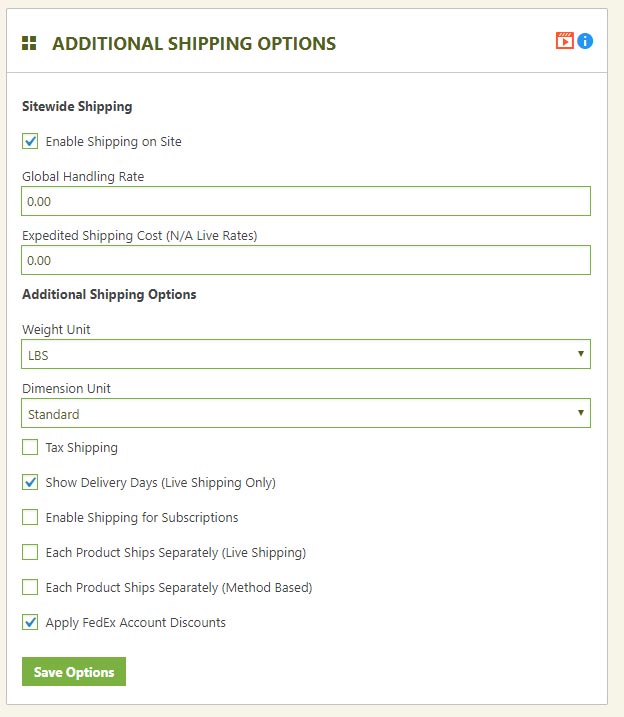
Step Four: ?Handling Fees and Expedite Order Options
EasyCart has tried to make shipping as flexible as possible, without getting overly complicated that nobody could set it up. ?Two options that are common are to add a handling fee. ?Let’s say you have a trigger rate system or live shipping system, but want to add a simple $5.00 handling charge to it, we provide a quick way to do so. ?Another option is to do it at the product level. ?Only add a handling charge to a product IF you enter it at the product level under advanced pricing options. ?A great example is a furniture store… a couch may incur an extra large handling fee on one product, while the rest of the products may be just regular shipping rates.
We also offer an ‘Expedite Shipping’ option. ?This can represent anything you want, maybe same day processing or actually a shipping expedite upgrade. ?You can choose to enter that for trigger rates or not.
Fifth Tip: ?Don’t be afraid to be a little off on shipping. ?If you get fairly close on shipping costs, it usually will come out in the wash. ?Consider the time and hours it may require to setup a perfect shipping solution versus setting up a really good solid simple solution easy for customers to understand and you may come out neutral.
[divider]
Step Five: ?Keep It Simple Stupid (KISS)
As a web developer or business owner who is building their own website, the old web design rule of keeping it simple stupid should apply… ?Try to keep things to a minimum because if it’s hard for you to figure out, your customers may find it impossible to understand. ?Many visitors want a choice or two on shipping, or to have it simply calculate automatically… which makes trigger table rates a good choice. ? Static rates work great for flat rate type orders… giving customers simple pricing that is consistent and accurate.
The fewer intricate?details you try to build into your shipping system the fewer errors you will receive on shipping, the less over and under charging you will receive, and the more conversions can be had by doing so. ?Fewer errors, fewer complaints, and more conversions is what every store owner wants! ?Keep It Simple…
Sixth Tip: ?Remember EasyCart is an $80 dollar plugin made for the masses in WordPress. ?If you NEED a solution that you do not see, you might consider ramping up to an Enterprise shopping cart solution and spend the thousands it costs to attain your specific customization.
Beginning in version 3 of the WP EasyCart, we offer developers the option to keep the latest theme and child files up to date automatically as the plugin upgrades without having to manually upload the latest store theme and store layout! This is a great option to help developers keep their clients’ stores up to date and functional at a single click of the button. With this great new feature?we know developers still need the ability to override certain?files, images, css, etc… In order to make the store customized for their specific project (a great example of this is customizing the email receipt).
This is where a child layout becomes an extremely important feature! Child themes and layouts allow you to specify a child theme or layout folder in which you can place individual files to override a specific functionality of the store, while simultaneously allowing your theme and layout to keep the latest features for the rest of store.
How Does the Store Find a Layout or Theme File?
Every file loaded from the design folder of your shopping cart system goes through the following check to find the correct file:
Does the file exists in the plugins folder at wp-easycart-data/design/layout/{your selected child layout}/file.php?
If not, use?the latest file in the wp-easycart/design/layout/base-reponsive-v3/file.php
This applies exactly the same to the theme folder and can be useful for specifying a custom image not found file.
How to Set Up and Specify a Child Design
Setting up and specifying a child theme or child layout is quick and easy! First, add a new folder in the wp-easycart-data/design/layout/ folder (something like my-custom-layout) and repeat this for the wp-easycart-data/design/theme/ folder. Next, go to the WordPress Admin -> WP EasyCart ->? Settings -> Design area and select your newly added custom theme and/or layout folders in the drop down boxes.
That is it! Your store will now look first in your custom child theme folder and next to the latest files in the main plugin. To override any files you should first copy the file you are editing to your custom theme folder and make your corrections there (custom changes should be in the wp-easycart-data folder).
https://blog.wpeasycart.com/wp-content/uploads/2014/10/device-previewer.png612823Josh Joneshttps://blog.wpeasycart.com/wp-content/uploads/2021/05/Logo-V4.pngJosh Jones2014-12-15 22:32:542017-11-27 19:47:26EasyCart Child Themes and Layouts