
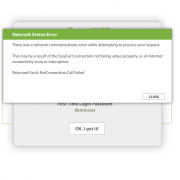
This troubleshooting guide is designed to explain and give troubleshooting steps to the Network Communication errors that can occur using the EasyCart administrative console software. In part, we hope to explain why this error occurs, and then how to take some simple troubleshooting steps to help get past it.
Many customers have asked about creating new products and designs on their WordPress pages and then simply inject or add EasyCart add to cart behavior or products on those custom pages. ?It is a common workflow, and while EasyCart develops an entire catalog system for you and your products, customizing ones pages to fit your specific needs is often a requirement.
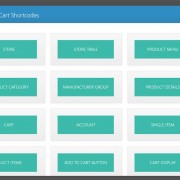
With EasyCart shortcode, it is easy to develop your own product pages and add only specific parts of EasyCart to your system. ?Here are a few good examples, but be sure to experiment with our shortcode to see all of the capabilities it has to offer.
This is very popular scenario, you have a few products, so you want to create highly customized WordPress pages and JUST use EasyCart add to cart behavior.


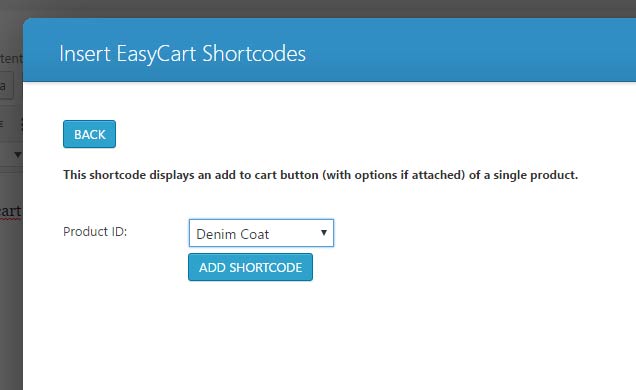
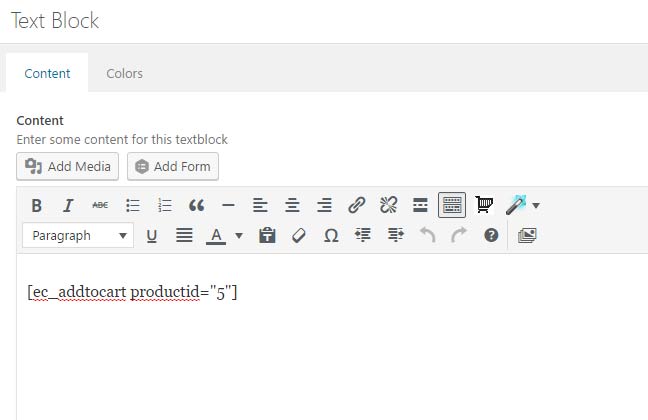
Here you can see shortcode in the default editor, but you can also add it to your theme if it has a page builder system and will represent shortcode appropriately.
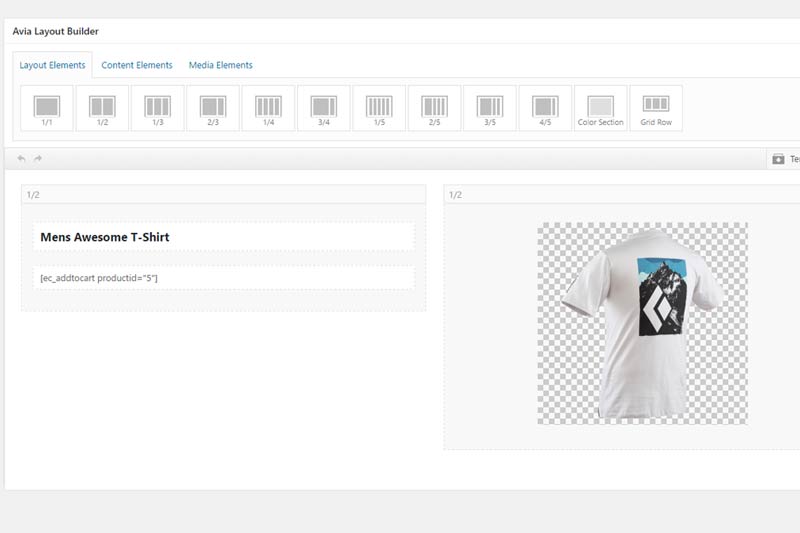
5. ?Now you can view your page, and if your product has option sets, those are also shown with your add to cart shortcode. ?Notice how this is a completely custom page built in WordPress, and ONLY the EasyCart product options and add to cart behavior are shown. ?This allows you to really extend EasyCart and WordPress by design and development on your own pages. ?(Of course EasyCart can do all this for you by using our regular catalog and product details pages that are created automatically, but for those wanting custom designs and complete control, this is a helpful feature.)

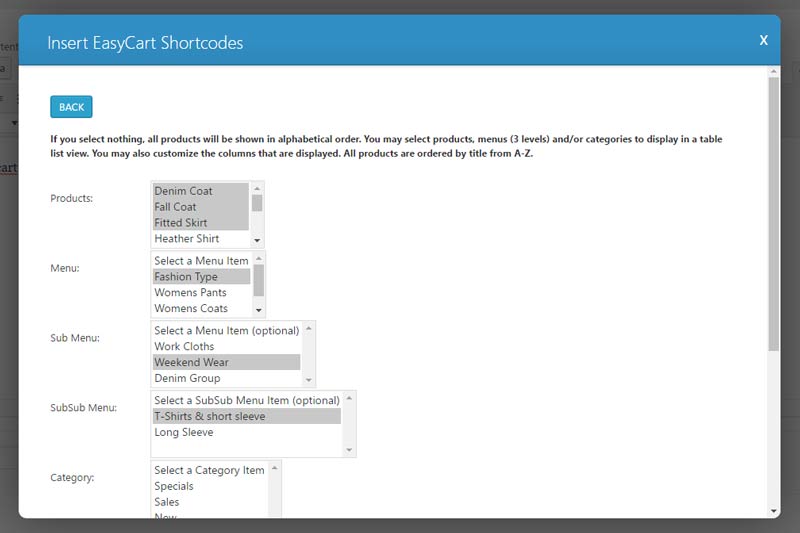
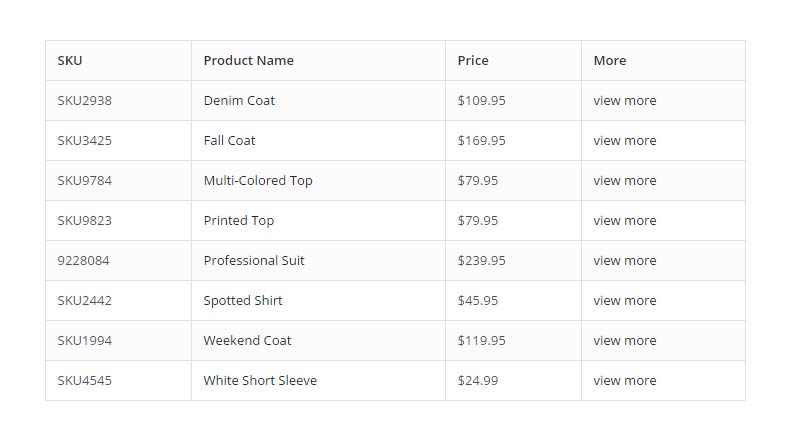
Many customers have asked for a way to build a table of products. ?We have an awesome shortcode for store table of products which allows you to quickly select groups of products, categories, and individual products and put into a quick shortcode table. ?Of course you could use CSS to custom design colors afterwards, but this shortcode really helps speed up the process of building a product table.

We have more shortcode?which allow extensive control over your product displays and setup. ?You can display custom product categories on a WordPress page, very popular to do. ?You can also display custom cart and account shortcode, place single items or selected items on a page, even create a page for manufacturers and place those designed manufacturer products on a page.
We offer membership content shortcode as well, so if you sell membership content such as video, downloads, or access to a members area of your website, simply use this shortcode and design ‘Member Content/Non-Member Content’ on a single WordPress page. ?IF the user is logged in AND has purchased a membership, then they can view that content, otherwise, show the user directions to purchase OR login.
For more information on shortcode, you can also visit our online documentation: ?http://wpeasycart.com/docs/3.0.0/themes/shortcodes.php

WordPress has recently released version 4.3, and there are thousands of plugins that are still working to become compatible with this latest release.
WP EasyCart has released a 4.3 compatible version, but it is critical that you update the plugin before you update WordPress.
What to do if you get a white screen?
If your website automatically upgraded to 4.3, then it may break due to plugins or EasyCart not being updated prior to this core WordPress update. ?You may experience a white screen, or a PHP error notice saying it is having trouble loading.
1. ?First, you will need to log into your website through FTP and disable the plugin, for exampe /wp-content/plugins/wp-easycart folder should be renamed to /wp-easycart-old.
2. ?Second, you can log into wordpress admin ?now and see that under ‘plugins’ that the conflicting plugin has been deactivated… ?in this case WP EasyCart.
3. ?Third, go back to FTP and rename the plugin back to wp-easycart.
4. ?Fourth, go ahead and upgrade the plugin in question to a 4.3 compatible version.
5. ?Fifth, you can activate the new upgraded plugin.
6. ?Now you should be able to continue using WordPress as usual
Are there a list of other plugins that might not be 4.3 compatible?
Unfortunately yes, there is a huge list of plugins that this is known to have an issue with, and with automatic updater for WordPress running on many websites, this could accumulate into a huge issue. ?We encourage everyone to turn off automatic updates if you do not want this type of unexpected update behavior to occur on your website.
Here is a list from GitHub of plugins still needing to be upgraded: ?https://gist.github.com/chriscct7/d7d077afb01011b1839d


Now you can market and promote WP EasyCart and earn 10% for each referral you make. ?We have integrated with AffiliateWP and are tracking affiliate referrals so you can easily earn commission, and get paid for your recommendations.
Theme developers will be glad to know you can earn extra revenue by posting that your theme is WP EasyCart compatible and link to our website. ?Earn 10% for each referral who purchases our standard or lite version plugins.
Web designers, now you can become an affiliate and have your customers purchase a license directly from us, while still retaining 10% profit.
It’s easy, just Click Here to Sign Up?and then you will receive a unique URL to promote on social media, your website, or email and referrals are automatically tracked with your account.
The WP EasyCart can leverage?the WordPress option “custom post types” to help with the linking of your products, categories, menus, and manufacturers. Using this feature, we are able to create links like http://yoursite.com/store/mens-beanie, rather than http://yoursite.com/store/?model_number=abc123.
This option is enabled in the EasyCart system by going to your WordPress Admin -> WP EasyCart -> Settings -> Additional Settings? and turn “On” the option “Use Custom Post Type Linking”. Once this is functioning, your links will now go to a more search engine friendly URL, but there is a downside. WordPress uses your default post template in your theme called “single.php”.
If this file does not look how you like or looks very different from your store page template, it will cause a disconnect from product list page to product details page. Fortunately there is a solution! Directions will be provided here, but you can read more about this setup in WordPress’s codex here:?http://codex.wordpress.org/Post_Type_Templates.
This will allow your store to use a custom design for the product details, categories, menus, and manufacturers.
We have had a huge demand for adding a custom payment integration to your own EasyCart install and it is finally here. Starting with the release of version 3.0.19, you can add a live payment gateway that is customized by you, the programmer! Fair warning to those who are not familiar with PHP, this may be a little difficult to manage and is meant for those with a good understanding of programming.
The highest demand for this service is for those companies that use an Authorize.net emulator. This type of custom gateway is by far the easiest and will the first example provided here.
To start, lets explain how the custom payment gateway option is integrated in general, minus the programming details of customizing the class for your own payment gateway.
[divider]
1. Start by going to your WordPress admin -> EasyCart Admin -> Store Setup -> Payment?Setup and in the Live Payment Gateways section, and select the last option “custom payment gateway”.
2. The system is now looking to include your new payment gateway file, so lets copy an existing payment gateway file into place and rename it so that it is included in the load of the plugin. Do this by copying the file “plugins/wp-easycart/inc/classes/gateway/ec_authorize.php” to “plugins/wp-easycart-data/ec_authorize.php” and rename the file here to “plugins/wp-easycart-data/ec_customgateway.php”.
3. The system is also looking for a class named “ec_customgateway” so lets fix this up. Open the newly copied ec_customgateway.php file and rename the class to read on the first line:
class ec_customgateway extends ec_gateway{
4. At this point you have a custom gateway setup, but need to customize this to function as a custom class to your system. Please read the next section about editing the class to work as an Authorize.net gateway emulator.
[divider]
If you have not completed the “Basic Custom Payment Gateway Class Setup”, please complete that section first. There are many companies that use the Authorize.net API as their method for collecting payment from their merchants. The reason they do this is that Authorize.net is one of the most popular, if not the most popular integration in the e-commerce industry and by leveraging their API, they can quickly integrate with any platform. Their system requires you to change the endpoint (the server that receives the transaction information) to point to their own payment servers. The following steps will help you alter the newly created payment class:
1. The first thing to do is enter your custom settings and there are two ways to do this. The easiest way is to first return to?WordPress admin -> EasyCart Admin -> Store Setup -> Payment?Setup and in the Live Payment Gateways section and change back to Authorize.net as your payment gateway. Enter your login id, transaction key, test mode off, and your currency code, then click save. At this point the authorize values are saved to your system, no matter what gateway you select from this point on. So you can now open the live payment gateway section again once the page reloads and switch it back to the custom payment gateway option. The other option here is to replace the following code:
$authorize_login_id = get_option( ‘ec_option_authorize_login_id’ );
$authorize_trans_key = get_option( ‘ec_option_authorize_trans_key’ );
$authorize_test_mode = get_option( ‘ec_option_authorize_test_mode’ );
$authorize_currency_code = get_option( ‘ec_option_authorize_currency_code’ );
TO:
$authorize_login_id =?”YOURLOGINID”;
$authorize_trans_key = “YOURTRANSKEY”;
$authorize_test_mode = false;
$authorize_currency_code = “USD”;
2. Edit the get_gateway_url method to use the emulator endpoint instead of the authorize endpoint.?The edit will change:
$is_developer_account = get_option( ‘ec_option_authorize_developer_account’ );
if( $is_developer_account )
return “https://test.authorize.net/gateway/transact.dll”;
else
return “https://secure.authorize.net/gateway/transact.dll”;
TO:
return “https://yourendpoint.com/endpoint”;
3. At this point you should be able to upload your custom gateway and run it successfully. We have noticed some errors occur in that the response may not be returned in the “body” as Authorize.net does. If this is the case, you will need to investigate the format of the response and is easily done by changing:
function handle_gateway_response( $response ){
TO:
function handle_gateway_response( $response ){
print_r( $response ); die( );
which will print the response to the screen and stop once printed. Use this to point yourself to the right response information to process and remove it when you are happy with your understanding of the response data.
[divider]
We also know there may be some of you out there that have a company you would like to integrate with that does not follow closely to any other payment gateway. We will do our best here to describe our process for custom integration with payment gateways.
1. We recommend using the ec_securenet.php payment gateway class as a starting point. The reason for this is that it covers many of the most common requirements for custom gateway integration.
2. Typically there are two types of data format that are sent to your payment gateway, an array or XML string. The ec_securenet.php shows gateway data in the format of an array, use this is a starting point if you are going that route. If you are using a gateway that accepts XML data, look into the ec_securepay.php file instead.
3. Notice that ec_securenet.php does not use the method “get_gateway_data” as this is not necessary when you need to use a custom CURL call (ec_securenet.php does this). Some gateways work great with the default call and in this case, follow the format of returning the data through the “get_gateway_data” method. This is a technical option based on the requirements of the payment gateway. Following the ec_securenet method is the easiest way to avoid technical difficulties.
4. Some gateways require an authorization header and ec_securenet as an example of this. If your gateway does not require this, you can remove the line that adds this to the header array.
5. Once you are able to build and send your gateway data, the next, and most difficult, part is to process the response. ?We always send the response data to the “handle_gateway_response” method for processing. Please notice that if you are viewing the securenet version, the response from them is in JSON formatting and is why we process it through the json_decode function first, but many gateways return their data as an array in the $response[‘body’] array element. Our recommendation is to start by sending the whole response into the “handle_gateway_response” method and use a print out to determine where to go from there. Once you send the data to the response function, we should start by adding “print_r( $response ); die( );” to the top of the “handle_gateway_response” method. This will show you the path to getting the response messages out of the data and applying them to the correct class data elements.
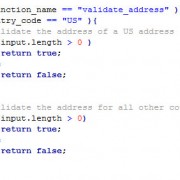
6. The first processing step is determining the attribute that signifies a successful payment, typically an “APPROVED” or “SUCCESS” value and may be accessed through $response[‘body’]->result or $response[‘result’]. If XML is returned, you may need to first run the $response data through:
$response_body = $response[“body”];
$xml = new SimpleXMLElement($response_body);
and access the value by $xml->result or something similar. This is the most difficult task because it requires you to have a complete knowledge of the type of response and if it is formatted as an?array, object, xml, JSON, etc… Once you are able to access and check for success, set the $this->is_success to true or false.
7. We also ask that if there is an error, try to set $this->error_message = $xml->response_message; or whatever your response error message is.
8. The last thing to do is insert the response to the database for later access and troubleshooting. This is done by editing the following line to fit your needs:
$this->mysqli->insert_response( $this->order_id, !$this->is_success, “Gateway NAME”, print_r( $response, true ) );
If you are able to get through all of this, get a response from your gateway, process the return data?successfully, and set the success value to true or false, then you are done. The EasyCart will insert and process the order based on your success value and requires nothing else once you get your gateway setup to process the credit card through your own gateway.
[divider]
If and when you complete your custom payment integration, you are welcome to send to us for review and to add the gateway as a default option in the cart.?Having?us add new gateways to the cart is especially useful for developers that reuse the EasyCart for multiple projects and want the same gateway to be available quickly. We are always open to adding new gateways, so please contact us in the event that you would like your gateway in the cart by default!
WP EasyCart offers an abundant amount of shipping options all within a low-cost plugin, but that doesn’t mean the options are not as powerful as some competitors plugins. ?The shipping options of an online business can be confusing, and often difficult to setup regardless of the plugin used and the configuration needed. ?When you consider all the facts that need to go into a good well rounded shipping system, it can easily be overwhelming.
This guide is to help you consider some of the many options EasyCart has to offer. ?While I will be the first to say we do not offer ALL shipping configurations and options one could conceive, we do offer a good well rounded majority of choices that many businesses can adopt.
First Tip: ?? Before you read further,?consider every software package is built for the masses, so if you have developed a shipping system that MUST be used, reconsider as it may not be conventional at all and/or have a small portion that will not conform to any software package… ?be flexible as you explore options in software.
?Second Tip: ?Are your products shippable. ?Not every item in EasyCart is made to apply to shipping charges. ?Downloads and Gift Cards for example are digital goods, they will not trigger shipping charges on checkout. ?Also consider if you have a weight for a product! ?If you enter a weight of 0.00 for a product, then it’s considered intangible good like a service… so shipping will not apply.
[divider]
WP EasyCart offers a variety of systems, all fit different businesses, different models, and will likely cover at least a good portion of what shipping system you need in your business.
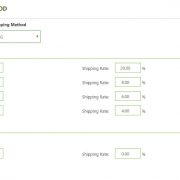
Price and Weight?Table Rate – These methods use triggers to establish shipping prices. ?The are extremely stable if you set them up correctly and provide a quick return on shipping rates. ?You essentially enter either a price or weight?that you want to trigger and the rate it should show. ?So you start with a trigger price or quantity ?of 0.00 and then establish a rate, say $5.00. ?Then at maybe $50 dollars you want to trigger a rate of $7.50 and then at $100 you want to trigger $10.00. ?so on and so forth. ?Same goes for weight, if a user has a total weight order of 5?in their cart, then trigger $x.xx amount, so on and so forth. ?Remember that weight in EasyCart is just a numeric value… it can represent pounds or ounces, you set the measurement of calculation in various places where appropriate, such as live shipping gateways which use this. ? Easy to setup, and easy to see working.
Percentage Table Rate – This method is the same as price and quantity, except you simply establish a set percentage when a trigger price range is reached. ?Say from $0.00 to $99 dollars you want to charge 10% shipping, and then from $100 – $500 in cart total you want to charge 7.5% in shipping, this method allows you establish tiered pricing using ?a percentage of their order. ?Again, very easy to setup and very reliable system.
Quantity Table Rate – Like the other table rates, quantity table rate shipping simply adds the total in the cart. ?This can be appropriate if you need to track how many items there are and then charge appropriately. ?Set a quantity trigger, and then the price to charge. ?The quantity table system only looks at products, so if you have option sets that change quantity, it will likely not be affected. ?So this may work in your situation, or it may not. ?It’s reliable and easy to setup.
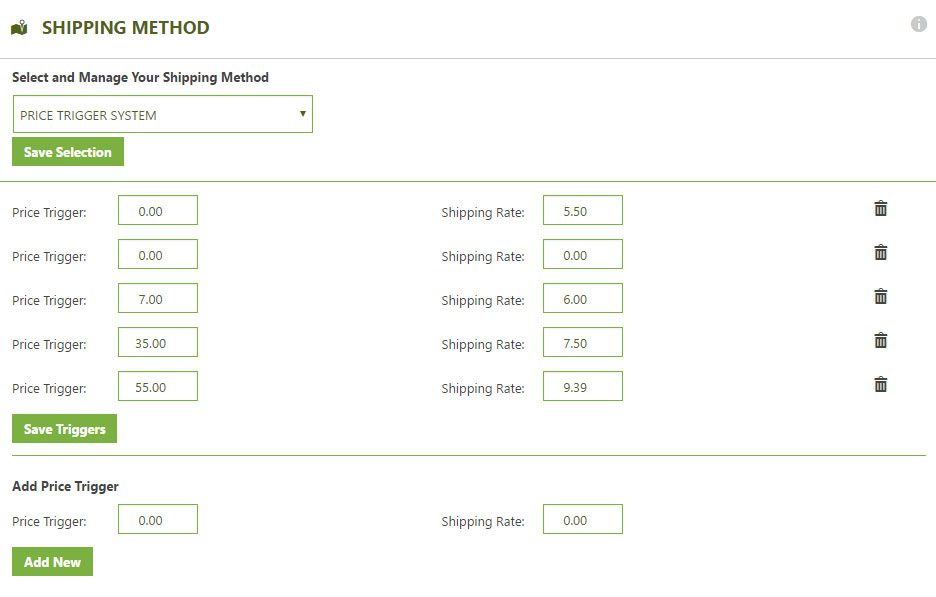
Static Method Rates – ?These are by far the most reliable shipping methods available. ?Set a name for the static shipping and a rate… that’s it. ?So if you always ship ‘Standard Ground’ and charge $5.00 for it, use this method. ?Customers always see the correct list of options. ?You can create several shipping methods using this option, such as a ‘Ground’, ‘Next Day Air’, ‘Express’, ‘In Store Pickup’ or whatever you need. ?It gives you control over labeling, pricing, and options available to customers.
Fraktjakt – This is primarily only available to swedish residents, but a popular option that allows customers to select from several live carrier rates and get current up to date rates.
Live Shipping -?UPS, FedEx, USPS, DHL, Australian Post, and Canadian Post have all been pre-integrated with EasyCart. ?Live shipping can be intriguing and many businesses think they want live rates, but there are a few considerations before you choose to go this route. ?Every detail must be accounted for on your part of the setup. ?If you think you can just offer UPS Ground, think again… ?Hawaii, international orders, they will see error messages with that setup. ?If you offer only Express and 2nd day air, think again, some cities don’t offer all services… so those customers will see error messages.
Live shipping can be difficult to understand, but the key to it is to consider every single variable in the shipping world and it needs to be setup. ?If you are game to tackle this, then we can show you some tips.
1. ?Setup one shipping carrier first, get it working, connected, and then move on to another carrier.
2. ?Include as many shipping codes as you can. ?I realize you may just want ‘ground’ and ‘2nd day air’ but those may not be available in all cities or locations. ?Adding more shipping codes means that you will likely get more to show to the customer and also less errors and holes in your locations.
3. ?Do not apply shipping zones. ?We will discuss this later, but if you only ship to US and Canada, don’t create zones for that. ?The purpose of zones is to provide different rates, not limit who can buy on your store. ?Get the entire shipping system working for your default country, whether that be US, Canada, Europe, Australia, or wherever…
4. ?Use as few shipping carriers as possible. ?It may be nice to show FedEx, USPS, UPS, and DHL, but that’s 4 calls to 4 carriers during checkout and can greatly slow the system down. ?Try to stick with one or two.
5. ?If you want to offer free shipping, simply add a common shipping code, such as ‘Ground’ and then override the price with $0.00. ?You can even override the name of it and say ‘FREE shipping’ so customers have that as a selection.
6. ?Even if you enter 6, 7, 10 shipping codes, EasyCart will only display what the carrier returns for that location. ?So your customer may only see 1, 2 or 3 rates. ?This is why we really suggest testing. ?We have found some cities require select shipping codes if shipping within the same city. ?If you have zero rates returned, we suggest you look at your settings zip code and the zip code during checkout and contact your carrier to see what rates are available.
7. ?IF you have negotiated special rates with your carrier, we will try to display those instead of general rates. ?AGAIN, test, test, test… ?you are the web developer and that is part of the job!
[divider]
We can not say it enough, but as a WordPress user you are likely taking on the task of making a website yourself. ?Part of that job is to test your system. ?Don’t assume it should just work or is working without going through the entire checkout process as a customer would. ?This would be like fixed someones automobile as a mechanic and then assume it’s fixed and hand the vehicle over to the customer. ?Always check to see if it is working as desired and fix accordingly.
Even when using basic table rate shipping systems, we have seen gaps in triggers, which means there is no rate going to show up. ?We have seen live shipping setups without any shipping codes, which means no user will ever be charged shipping.
[divider]
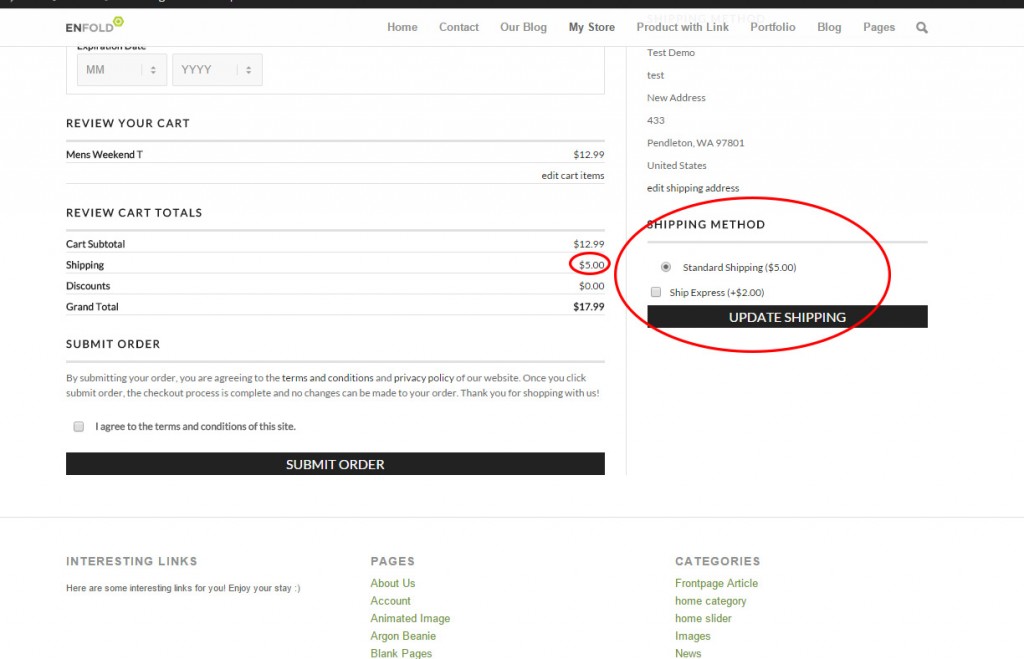
IF you feel you need to have a shipping zone, then you must be thorough about your setup. ?Shipping Zones is not for the faint of heart. ?You must have a thorough knowledge of what it means to setup a shipping zone, and DO NOT use shipping zones to limit who can buy from your store. ?That is not the purpose. ?IF you want to remove china or any country from ordering, do so by removing the country from the pull down of countries within the store admin -> settings -> manage countries.
Third?Tip: ?Think of shipping zones as a post-address filter. ?It only works AFTER the customer has entered their billing/shipping address information. ?NOT when a customer just views the shopping cart.
So you decide you want to setup different rates for the US versus Australia versus Canada… ?EasyCart can do that, but only with the right setup.
1. ?Setup all of your shipping for your default country with ‘Do Not Apply Zone’ for every setting. ?Whether using table rates, static, or live rates, set it up first without any zones.
2. ?Test to insure it’s working for your default country. ?What this will do is establish a ‘Default’ rate that all customers will see when they simply add an item to the shopping cart and view the cart. ?Remember, they have not entered their address yet, so without a default, they would just see $0.00 for shipping, and it’s better to supply SOME type of shipping in the cart.
3. ?Once all your default shipping is working, now you can setup a shipping zone. ?Lets say you are in australia, and you setup all your shipping for australian customers. ?Now you can add more shipping prices, triggers, or live shipping codes and add a shipping code. ?So maybe you use Australian POST live rates, you could add ‘International shipping’ with a shipping zone of ‘North America’. ?IF easycart sees a user checking out from anywhere in North America, it will apply International Shipping code that you applied. ?If someone from Europe ordered, it would not see this ‘Post Fitler’ and just apply default shipping codes.
4. ?This means if you use, for example, Price or Weight table rates, you would setup an entire table structure with ‘Do Not Apply Zone’ and then you would create an entire table structure for ?each zone. ?It’s necessary that you do not have any gaps, so 10 trigger rates would be added for default, then north america, then europe, then asia, so on and so forth. ?This way you do not have any gaps…
Fourth?Tip: ?If you get confused, create a simple spreadsheet, list out the ‘Shipping Method’, ‘Trigger Rates’, and the ‘Rate expected’ and you can see how vast the options can become. ?Now throw in a shipping zone and see things multiply! ?Pre-Planning is important and can become overwhelming
[divider]
EasyCart has tried to make shipping as flexible as possible, without getting overly complicated that nobody could set it up. ?Two options that are common are to add a handling fee. ?Let’s say you have a trigger rate system or live shipping system, but want to add a simple $5.00 handling charge to it, we provide a quick way to do so. ?Another option is to do it at the product level. ?Only add a handling charge to a product IF you enter it at the product level under advanced pricing options. ?A great example is a furniture store… a couch may incur an extra large handling fee on one product, while the rest of the products may be just regular shipping rates.
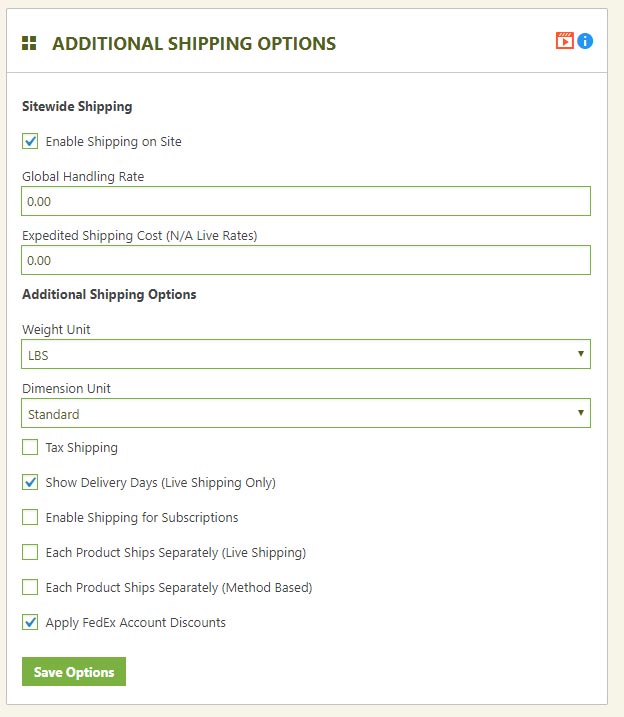
We also offer an ‘Expedite Shipping’ option. ?This can represent anything you want, maybe same day processing or actually a shipping expedite upgrade. ?You can choose to enter that for trigger rates or not.
Fifth Tip: ?Don’t be afraid to be a little off on shipping. ?If you get fairly close on shipping costs, it usually will come out in the wash. ?Consider the time and hours it may require to setup a perfect shipping solution versus setting up a really good solid simple solution easy for customers to understand and you may come out neutral.
[divider]
As a web developer or business owner who is building their own website, the old web design rule of keeping it simple stupid should apply… ?Try to keep things to a minimum because if it’s hard for you to figure out, your customers may find it impossible to understand. ?Many visitors want a choice or two on shipping, or to have it simply calculate automatically… which makes trigger table rates a good choice. ? Static rates work great for flat rate type orders… giving customers simple pricing that is consistent and accurate.
The fewer intricate?details you try to build into your shipping system the fewer errors you will receive on shipping, the less over and under charging you will receive, and the more conversions can be had by doing so. ?Fewer errors, fewer complaints, and more conversions is what every store owner wants! ?Keep It Simple…
Sixth Tip: ?Remember EasyCart is an $80 dollar plugin made for the masses in WordPress. ?If you NEED a solution that you do not see, you might consider ramping up to an Enterprise shopping cart solution and spend the thousands it costs to attain your specific customization.

Beginning in version 3 of the WP EasyCart, we offer developers the option to keep the latest theme and child files up to date automatically as the plugin upgrades without having to manually upload the latest store theme and store layout! This is a great option to help developers keep their clients’ stores up to date and functional at a single click of the button. With this great new feature?we know developers still need the ability to override certain?files, images, css, etc… In order to make the store customized for their specific project (a great example of this is customizing the email receipt).
This is where a child layout becomes an extremely important feature! Child themes and layouts allow you to specify a child theme or layout folder in which you can place individual files to override a specific functionality of the store, while simultaneously allowing your theme and layout to keep the latest features for the rest of store.
Every file loaded from the design folder of your shopping cart system goes through the following check to find the correct file:
This applies exactly the same to the theme folder and can be useful for specifying a custom image not found file.
Setting up and specifying a child theme or child layout is quick and easy! First, add a new folder in the wp-easycart-data/design/layout/ folder (something like my-custom-layout) and repeat this for the wp-easycart-data/design/theme/ folder. Next, go to the WordPress Admin -> WP EasyCart ->? Settings -> Design area and select your newly added custom theme and/or layout folders in the drop down boxes.
That is it! Your store will now look first in your custom child theme folder and next to the latest files in the main plugin. To override any files you should first copy the file you are editing to your custom theme folder and make your corrections there (custom changes should be in the wp-easycart-data folder).