Your eCommerce Store and Quickbooks
 Quickbooks is one of the most popular accounting software on the web for small businesses and using the desktop version with your eCommerce store can be a bit tricky. Ahead of the launch of WP EasyCart’s V2 Quickbooks Extension we wanted to take a little time to show you how the process works to automatically send orders, accounts, and products to your Quickbooks file.
Quickbooks Requirements to Connect
Quickbooks uses something called the Quickbooks Web Connector to send and receive data from some online data feed. You can read more about the QWC here:?https://developer.intuit.com/docs/0200_quickbooks_desktop/0100_essentials/quickbooks_web_connector — Once installed you can begin pulling data from your website directly into Quickbooks.
NOTE: This is only available on Microsoft Windows Systems.
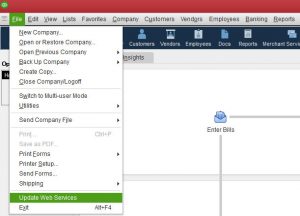
You can download the QWC software from Intuit’s Website by clicking here. Once downloaded and installed you can open the web connector by opening Quickbooks and clicking File ->Update Web Services. This will open a window that allows you to add your Web Connector File, which describes how Quickbooks should connect to your website’s data feed.

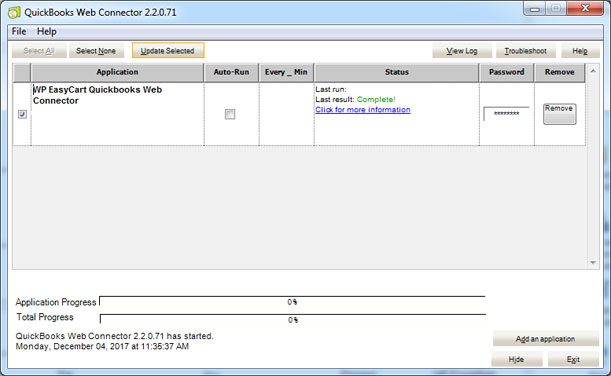
Once you get the web connector installed, enter your password and check the box to run that connector and hit ‘update selected’ to run. You may also use the auto-run feature, but it may be inconvenient if running while you are working in Quickbooks.

How Data Moves to and From Quickbooks
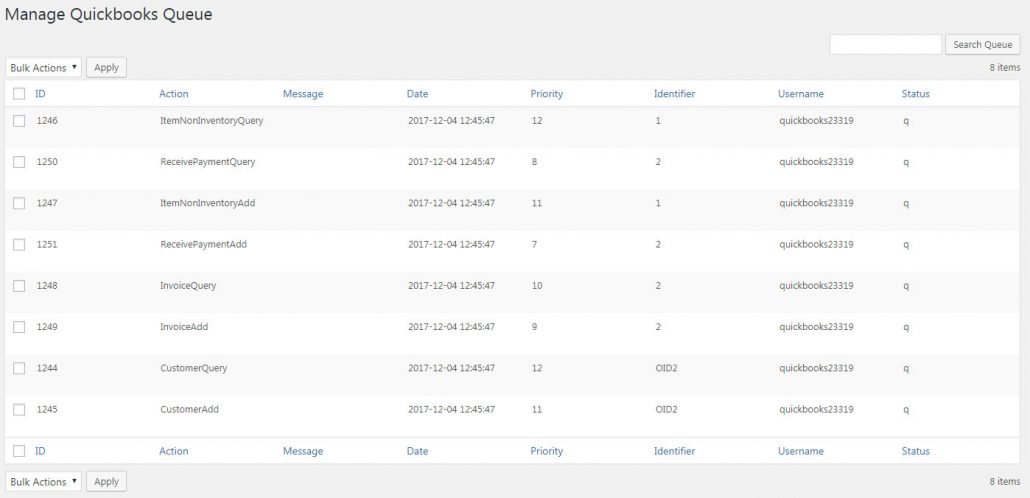
Pulling Data From Your Website: Now that you understand the mechanism that moves data between your website and Quickbooks, it is important to understand how data is prepared to send to Quickbooks. The data is not automatically moved the second you ask it to on your website, instead it is queued in a series of requests that wait for the Quickbooks Web Connector to call your website. For example, if someone places an order on your site, WP EasyCart Queues up the following:
- Make sure the products for the order are in Quickbooks (Query + Add if not found).
- Make sure the user has a customer account in Quickbooks (Query + Add if not found). Please note for this, if the user does not have an account (guest checkout) the customer is created with an OID extension to prevent possible conflicts with another user with the same name.
- Insert the order. This order is either inserted as an invoice + payment or a sales receipt, depending on your company’s preference.
Now that these are in the Queue, they wait there until Quickbooks Web Connector comes calling. This could mean that 100s of orders are added to a queue before you call the web connector and get all that info.
Pulling Data From Quickbooks: It is also important to import your various Quickbook settings from Quickbooks so that linking within invoices/users/products is done correctly. This is done by adding a query call to the queue. Once added, you MUST RUN your Web Connector to allow Quickbooks to send the info we asked for. This is very similar to pulling data from the website, but instead of sending the data and forgetting about the response, we send a query and deal with the response from Quickbooks.

Setup, Connections with Quickbooks Items and Accounts
It is also important to understand how things are connected behind the scenes and what can go wrong.
Everything in Quickbooks has an underlying ID and something called an Edit Sequence. The ID allows us to connect to accounts and items without using a name that can change. For example, you have a product named ‘Widget A’ and you sell this item in the store, if we send with the connection as ‘Widget A’ and you changed the product name to ‘Widget A – March Version’ in Quickbooks, the import will FAIL. If instead we just send as the underlying ID, Quickbooks doesn’t care what you change the name to on the store side OR Quickbooks.
The Edit Sequence we referenced earlier is kind of used as a way to prevent sync errors. This prevents you from updating the same thing from two places, which would cause unexpected results. By requiring the correct edit sequence value, Quickbooks ensures the item should be changed.
This process is used for every account connection, tax item, tax name (TAX or NON), product, customer, invoice, etc… WP EasyCart uses an initial query to grab all possible settings and asks you to choose a bunch of options that allows us to properly link IDs to lots of used elements within the Quickbooks system. Once setup, you can change names at anytime without breaking connections.
NOTE: Deleting products, accounts, items, etc… Within Quickbooks without updating the data in the WP EasyCart setup will cause things to fail. Quickbooks is very, very strict about importing data and if something doesn’t exist or is used incorrectly, it will fail silently. Keep this in mind as you work with Quickbook and WP EasyCart.
Importing Orders with Taxes and Shipping
Taxes:?Taxes within Quickbooks can be setup by state and connected via state tax items within WP EasyCart. This method is great for those that accept tax from lots of state agencies. The issue here is that Quickbooks does not allow you to pass in a total paid in tax, but instead re-calculates the tax based on your rates (setup in Quickbooks) and the tax status for each product. This works well if rates do not change often and you do a good job of setting up your products within the EasyCart. Its also great for paying sales tax in multiple states at the end of each quarter, because totals are easily viewed within Quickbooks.
If you, however, only collect tax for California you do not need to make it this complicated. Just setup a default ‘other item’ as your tax item and connect that to your default tax type. Do not setup a state tax connection, leave blank. This will switch to use a line item as tax and will GUARANTEE that your totals match from cart to Quickbooks.
Shipping:?Shipping is added to an order as a line item. This is connected in the setup to an ‘other item’ that you can setup as shipping payments.
Discounts:?Discounts are also added as a line item and are connected in the same way shipping is.
Typical Formatting Options
There are lots of useful options that can be added to your Quickbooks system (contact EasyCart for your requests), but we have already built some of the most commonly suggested features:
- Name formatting as First Last or Last, First for customers.
- Orders imported as Invoices + Payment Received (and Credit Memos on refund) OR Sales Receipts.
- Invoice # Extension – This allows you to make your orders import as, for example, 2000-WPEASYCART, which prevents conflicts between in house orders and possibly orders from multiple sources. Keep in mind if you have your cart orders coming in as #2000-#5000 and any of those orders already exist, import will fail!
Check Out WP EasyCart + Quickbooks Today!
WP EasyCart offers a full Quickbooks Extension and documentation! Please upgrade to WP EasyCart Premium today and make your business life easier with Quickbooks.


